In one of my previous post I described how to do the deployment manually on an Amazon EC2 server. And in this new series of posts I want to introduce how to deploy a Ruby on Rails 4.2 application on a Ubuntu 14.04 server from start to finish. I know there are lots of tutorials on the internet and even several books on deploying rails, however they are either outdated or not very clear how to do the deployment step by step. So in this series I will try to describe as clear as possible for each step.
In this first part I will describe how to install the web server and database. Here I will use Nginx, Unicorn and PostgreSQL.
Application
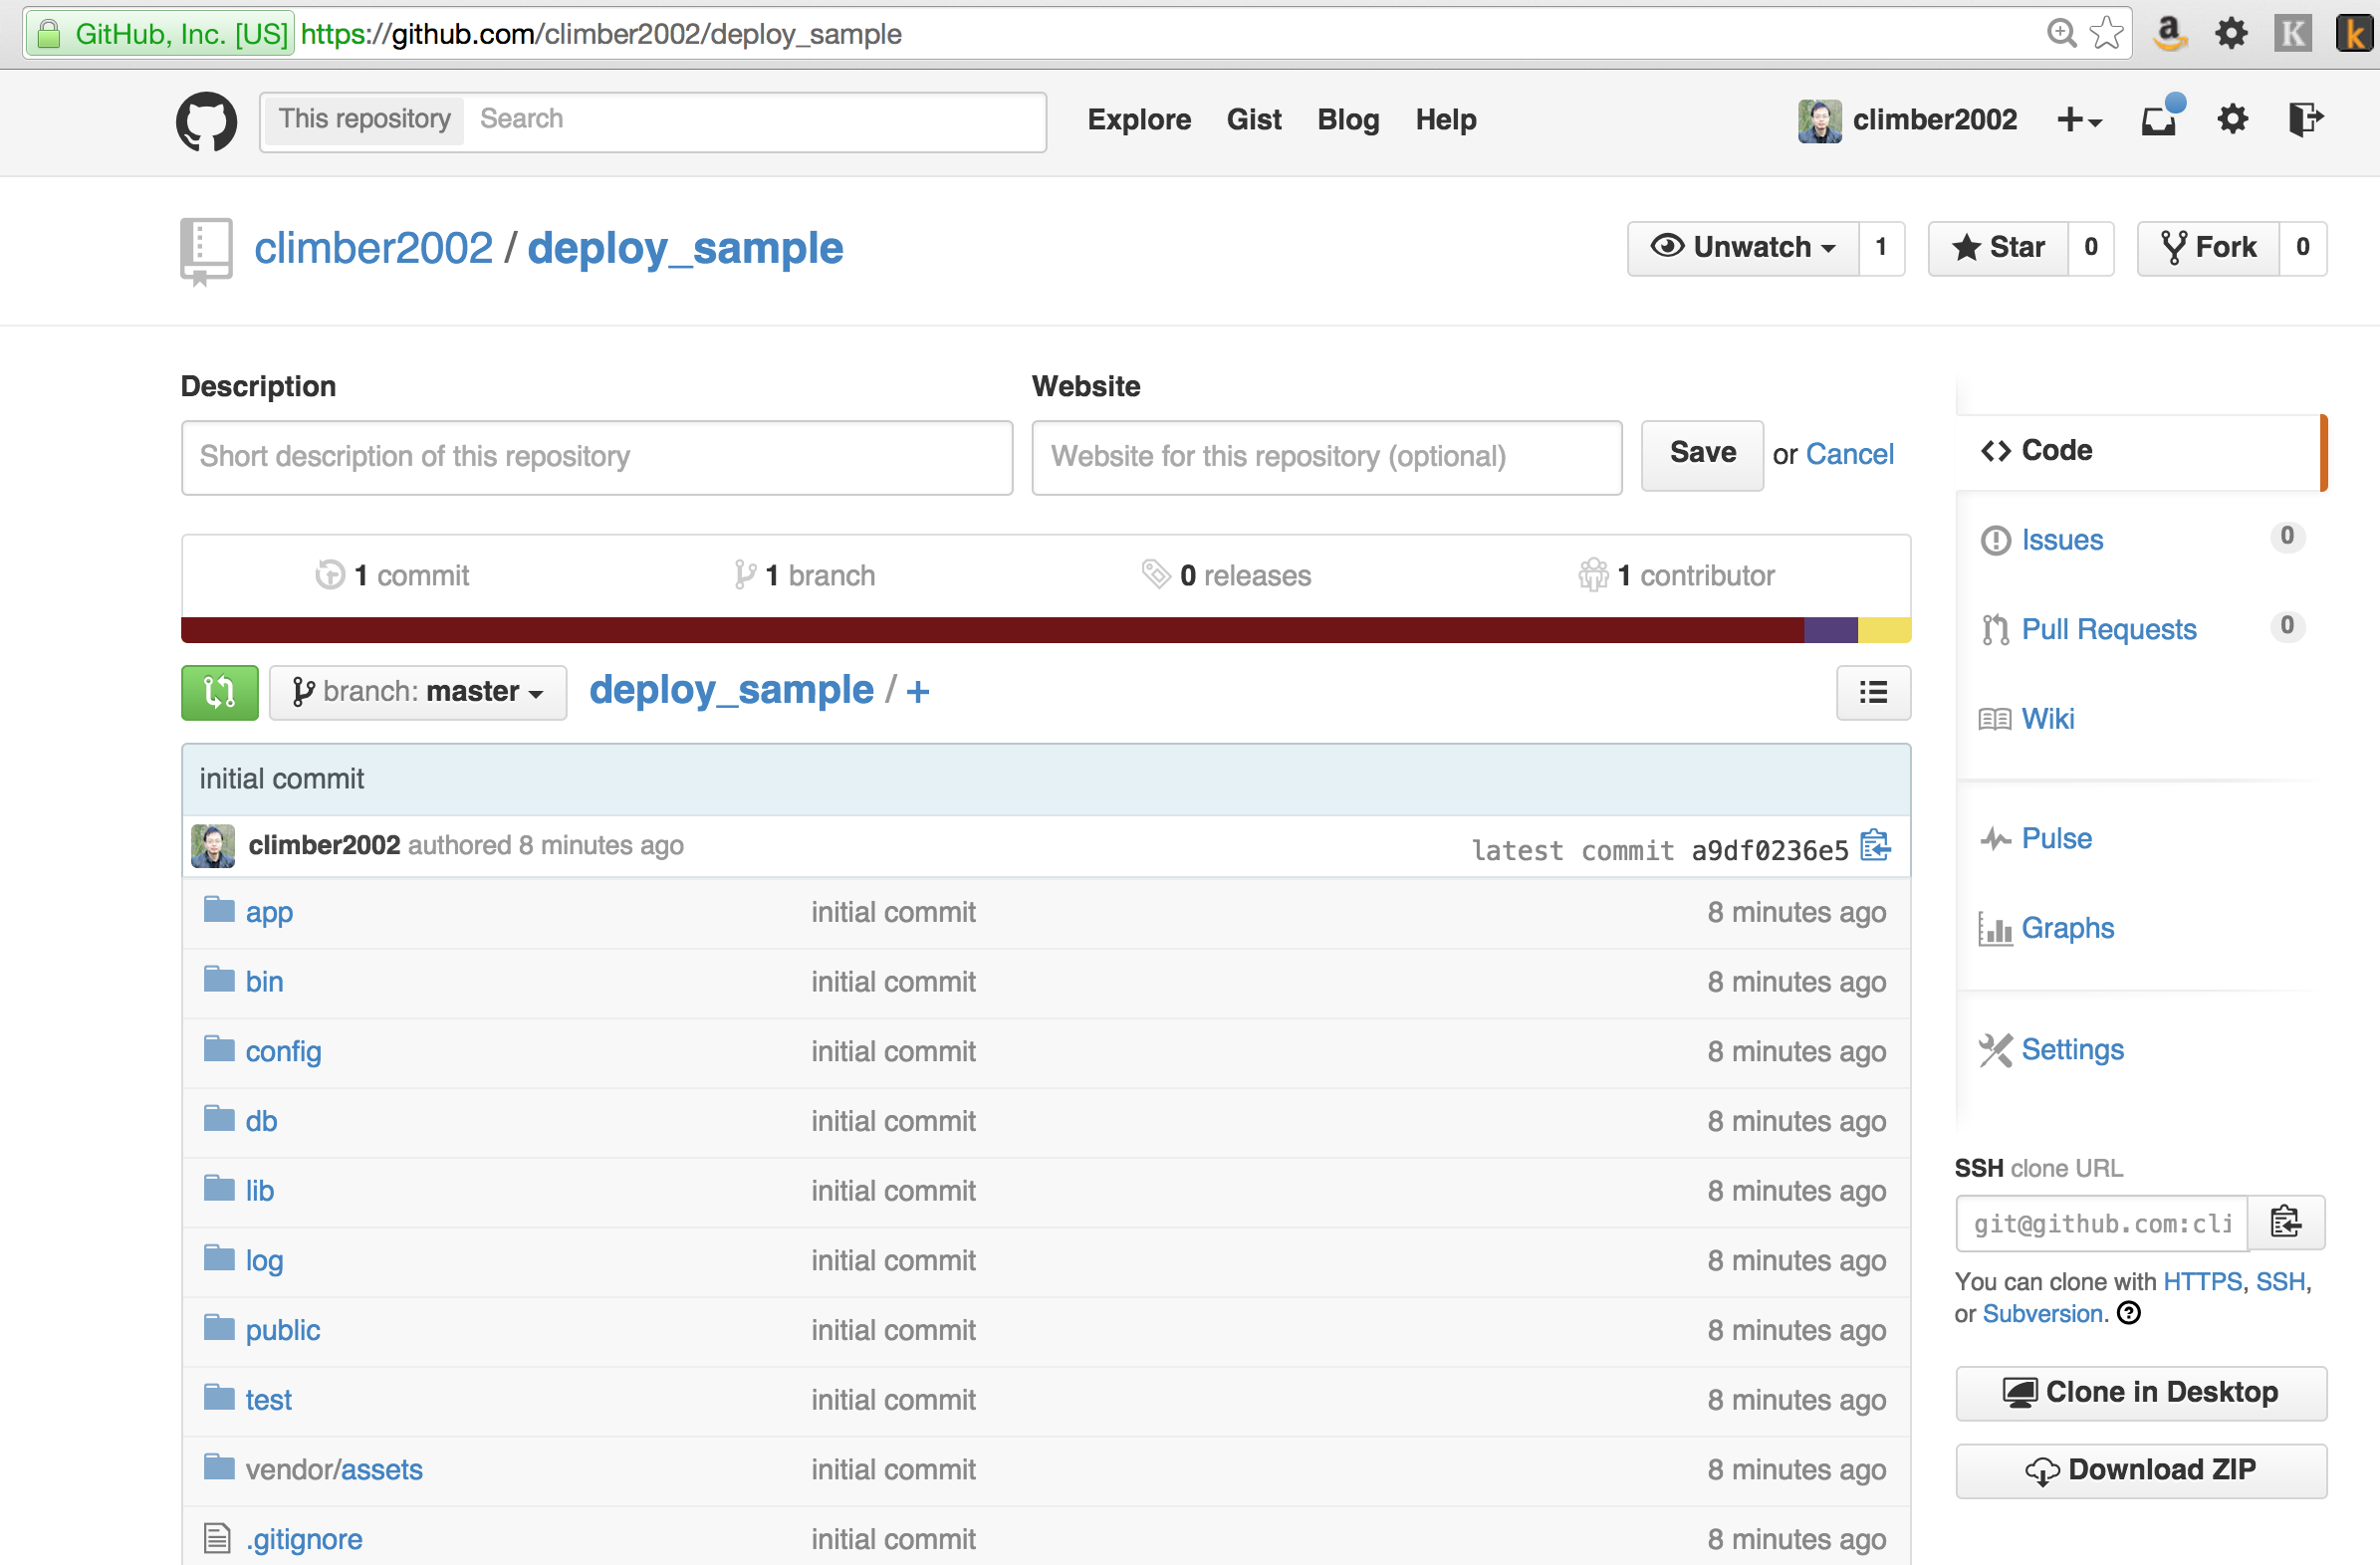
To demonstrate the deployment, I will create a sample Rails 4.2 application called deploy_sample.
1
$ rails _4.2_ new deploy_sample -d postgresql
And then I update the .gitignore file to exclude database.yml and secrets.yml from committing to repository.
Add the following lines to .gitignore
12
/config/database.yml
/config/secrets.yml
And then we copy the database.yml and secrets.yml to an example yml so let’s say if your colleagues need to work on this project, they could copy the example yml back and set their configurations.
Now this sample application will be used for our deployment
Vagrant
For demonstration I will use Vagrant to create a VM. But it should apply to any VPS too. Firstly you should install VirtualBox and Vagrant. The installation should be straight forward.
Then we create an empty folder in ~/Sites and init the Vagrant.
123
mkdir ~/Sites/deploy_sample_vagrant
cd ~/Sites/deploy_sample_vagrant/
vagrant init 'ubuntu/trusty64'
The vagrant init command creates a new file called Vagantfile. This file is configured to use Ubuntu 14.04 LTS server, codenamed “trusty”.
And I want to assign this VM a private IP address, so we can access it from host server later. So open the Vagrantfile and add the following line.
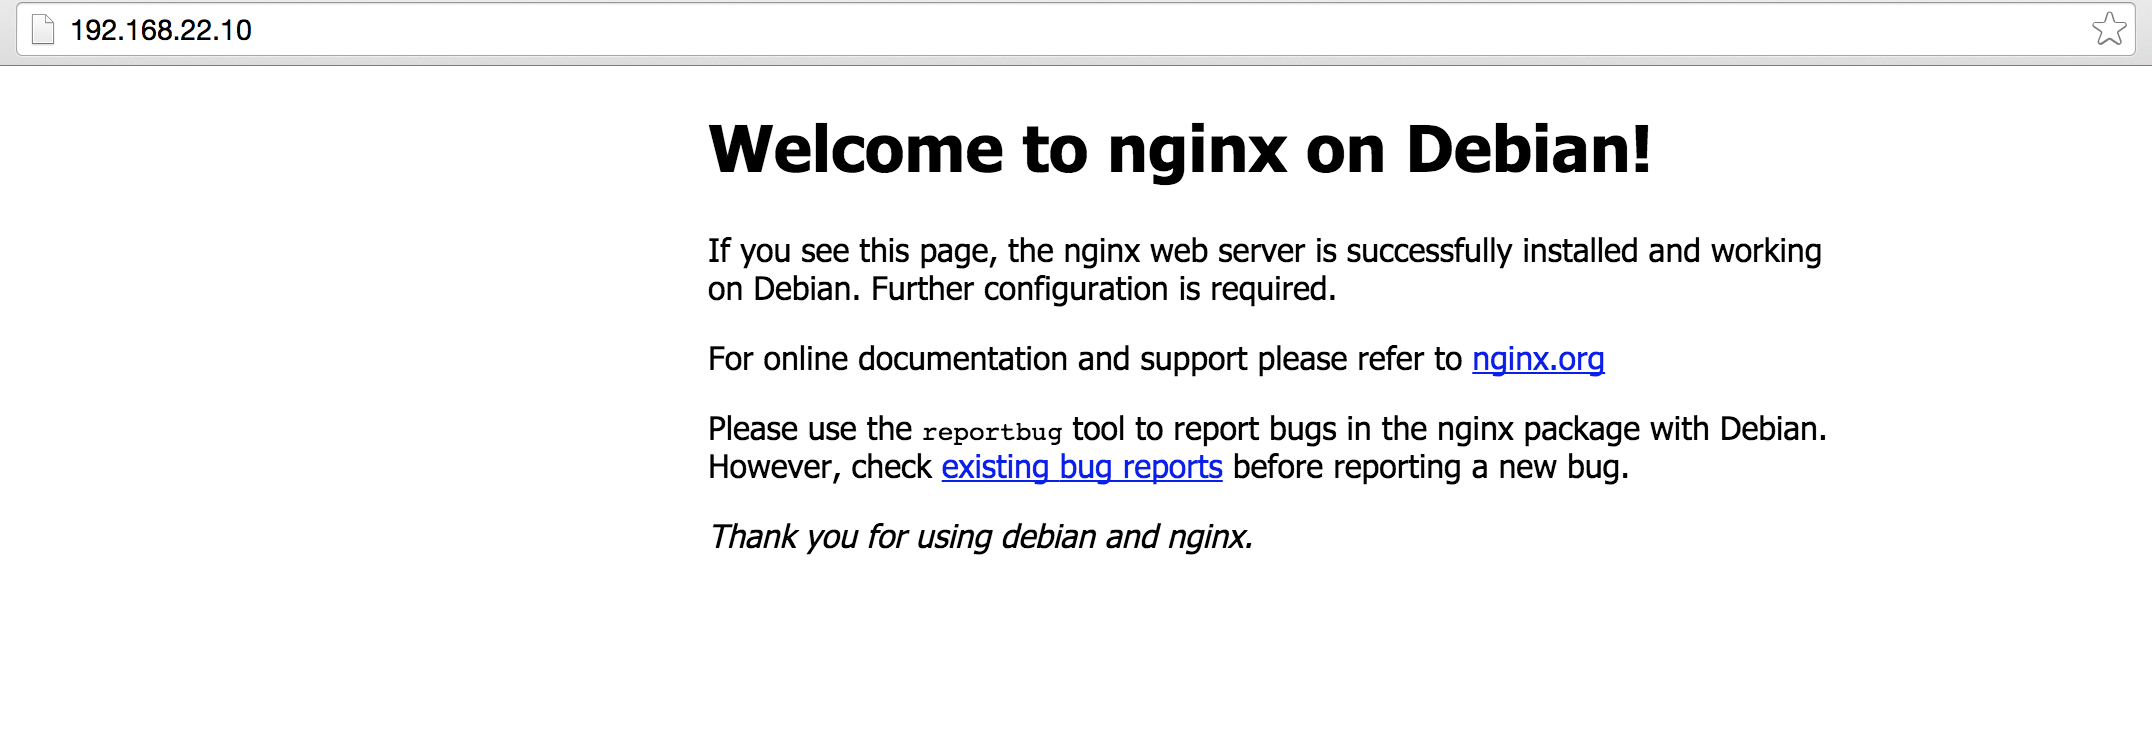
It assigns the IP address “192.168.22.10” to the VM. Later we can see that we can access the nginx by using this IP address.
Now in this folder we could type vagrant up to start the VM. If it’s the first time it will take some time as it needs to download the VM image from the internet.
After the VM is up, we could type vagrant ssh to ssh into the VM. Notice the prompt will change. If you are not sure whether you are in host server or the VM, just check the prompt.
1
vagrant@vagrant-ubuntu-trusty-64:~$
Install Basic Software
After our VM is up we could install some basic software.
After installation Nginx should start automatically. We could check its status by executing sudo service nginx status. And we could also access http://192.168.22.10 from our browser.
PostgreSQL
Now let’s install PostgreSQL. And again we add another repository.
The libpq-dev library is needed for building the ‘pg’ rubygem.
Installing PostgreSQL will create a user named ‘postgres’. This user is the owner of PostgreSQL.
Let’s create a password for postgres.
1234
$ sudo passwd postgres
Enter new UNIX password:
Retype new UNIX password:
passwd: password updated successfully
In PostgreSQL the user is represented by a Role. Now let’s create a role named deploy_sample.
1234567
$ sudo -u postgres psql
postgres=# create user deploy_sample with password 'secret';CREATE ROLE
postgres=# create database deploy_sample_production owner deploy_sample;CREATE DATABASE
postgres=# \q
The above lines will create a user deploy_sample and a database deploy_sample_production and set deploy_sample as its owner. The last command \q is to exit psql.
Monit
In next part we will use capistrano template for our deployment. And in that template it will also deploy Monit. According to its official website, “Monit is a small Open Source utility for managing and monitoring Unix systems. Monit conducts automatic maintenance and repair and can execute meaningful causal actions in error situations.”
So let’s also install that.
1
sudo apt-get -y install monit
After installation we can run sudo service monit status to confirm that monit service is already started.
Nodejs
We need a Javascript runtime so we are going to install Nodejs.
1
sudo apt-get -y install nodejs
Summary
In this part we setup a VM server and installed Nginx and PostgreSQL. In next part we will see how to deploy our rails app by using capistrano.
During the installation a user named ‘postgres’ will be created automatically and this user is used to start postgresql.
So we should change the password of user ‘postgres’.
1234
$ sudo passwd postgres
Enter new UNIX password:
Retype new UNIX password:
passwd: password updated successfully
The installation will put configuration files in /etc/postgresql/9.3/main by default.
12345678910
vagrant@vagrant-ubuntu-trusty-64:/etc/postgresql/9.3/main$ ls -la
total 56
drwxr-xr-x 2 postgres postgres  4096 Feb  7 09:26 .
drwxr-xr-x 3 postgres postgres  4096 Feb  7 09:26 ..
-rw-r--r-- 1 postgres postgres   315 Feb  7 09:26 environment
-rw-r--r-- 1 postgres postgres   143 Feb  7 09:26 pg_ctl.conf
-rw-r----- 1 postgres postgres  4649 Feb  7 09:26 pg_hba.conf
-rw-r----- 1 postgres postgres  1636 Feb  7 09:26 pg_ident.conf
-rw-r--r-- 1 postgres postgres 20687 Feb  7 09:26 postgresql.conf
-rw-r--r-- 1 postgres postgres   378 Feb  7 09:26 start.conf
Configure new data directory
Sometimes to improve performance, we want put postgres data files in its own disk. For example, we may mount a disk in folder /database and we want to put all postgres data file there. So let’s do that.
Suppose the /database folder already exists. We need to change its owner to postgres firstly.
1
sudo chown -R postgres:postgres /database
Now we need to initialize this folder as a data folder
12
$ su postgres
$ /usr/lib/postgresql/9.3/bin/initdb -D /database
We must su as postgres first since this user also owns the server process.
Now let’s stop server by running sudo service postgresql stop.
1
sudo service postgresql stop
Now we need to update the file /etc/postgresql/9.3/main/postgresql.conf,
change data_directory = ‘/var/lib/postgresql/9.3/main’ to data_directory = ‘/database’
PS: You need to stop the server first before updating the data_directory location. Otherwise the stop will fail and you need to kill the process manually.
After update the configuration file we need to restart postgresql server.
Recently in one of my projects I utilized a popular JQuery plugin called Selectize. And I need to do Integration tests by using Capybara. Here is how to simulate some general events of Selectize.
Firstly I use poltergeist Javascript driver, so in my rails_helper.rb it has following configurations,
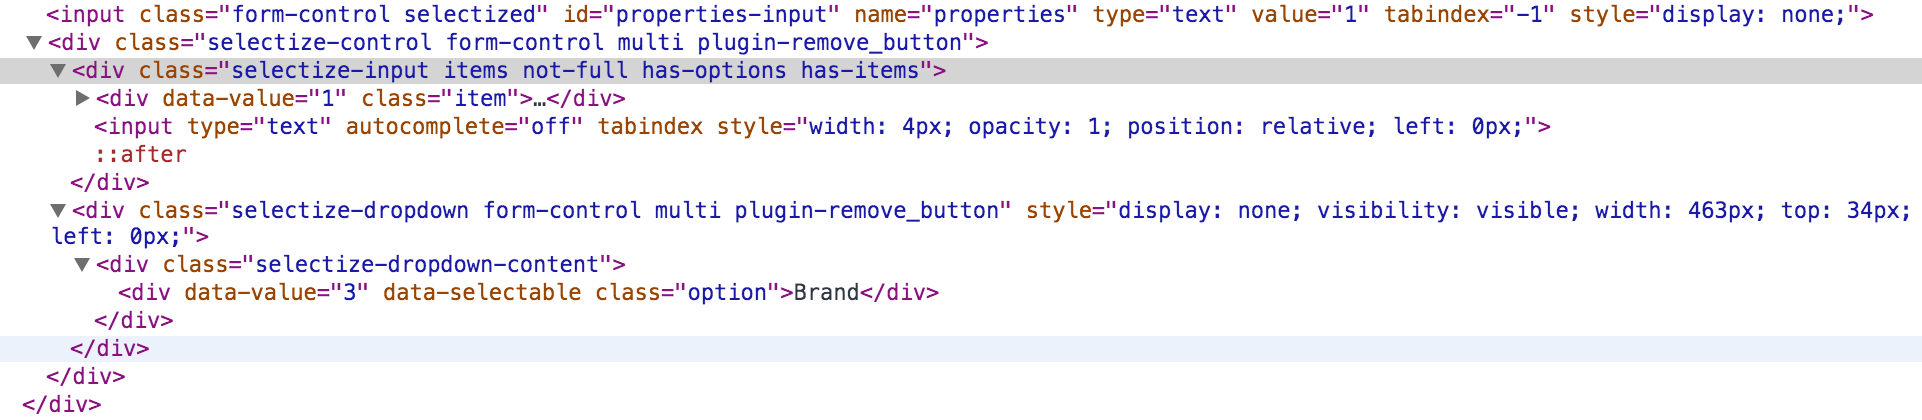
When a input box is selectized like the figure above, we can check it generates following DOM structure in our HTML,
The input ‘#properties-input’ is our original input, it’s set ‘display: none’ css property, and Selectize replaces it with another input, and the ‘div.item’ contains the items that we already selected, the ‘div.selectize-dropdown’ is shown as a dropdown when we click the input and lets us to choose another item.
So if we needs to select an item, we could do like this,
Here I use a xpath to find the parent of the input box that we selectized, and then within this parent we click the ‘div.selectize-input’, and the dropdown will show and we run find('div.option', :text => 'Screen Size').click to click the item that contains the text ‘Screen Size’.
Selectize also provides Ajax support, when you type something in the input, it could send Ajax requests to server to populate the items. So here we simulate the input,
This is to simulate input a ‘u’ character in the input, and if you configure the load option, it will send a Ajax request to the server to populate the items.
I’ve created a SelectizeHelpers class to simulate some common events,
The selectize_click(id) is to click the selectize input, the select_option is to select an option whose text matches the text. And set_text is to set some text in the input.
For the methods above, the id we should pass the id of the input that we apply the selectize.
In this blog I will list the steps needed to deploy a Rails 4 application on an Amazon EC2 server. The OS is Ubuntu Server 14.04 LTS, the database is Postgresql and the web server is Unicorn + Ngnix. Previously I mainly deploy the project on Engine Yard. But this time I need to deploy it on a server manually.
Updating And Preparing The Operating System
Update the Operating System
Firstly we need to update our OS by running following command,
1
sudo apt-get update
Change locale file
In some cases on my server it shows the following warnings,
1234567
perl: warning: Setting locale failed.
perl: warning: Please check that your locale settings:
        LANGUAGE = "en_US:en",
        LC_ALL = (unset),
        LC_MESSAGES = "en_US.UTF-8",
        LANG = "en_US.UTF-8"
    are supported and installed on your system.
The solution is to edit the /etc/default/locale and add the following contents,
12
LC_ALL=en_US.UTF-8
LANG=en_US.UTF-8
Install the necessary packages
Next we need to install the following necessary packages by running,
The python-software-properties allows us to easily manage your distribution and independent software vendor software sources. It will be useful when we install Postgresql and Nginx.
The nodejs is a Javascript runtime for Rails.
Install rbenv
Now we need to install a Ruby runtime. I choose rbenv instead of rvm, which is more lightweight for production.
Let’s install rbenv by running the following command,
Here we set worker_processes to 5, and in the server our application will be at /data/xhoppe. And the stdout_path and stderr_path are set to /data/xhoppe/log/unicorn.log.
Install Postgresql
Now let’s install Postgresql.
I want to install Postgresql 9.3 but the Postgresql version in default repository is 9.1. So we install Postgresql 9.3 by typing following commands, refer here
The XHOPPE_DATABASE_PASSWORD is the production database’s password. And the SECRET_KEY_BASE is for rails session, which is generated by running rake secret.
After that we can run source env.sh to set these environment variables.
In last post we discussed the initialization process when a Rails application starts. And we disucssed in config/environment.rb it calls Rails.application.initialize! to initialize the application. And in this blog we will have a detailed examination what has been done in this method.
Let’s have a look what’s in that method,
12345678910111213141516
# rails/railties/lib/rails/application.rbmoduleRailsclassApplication<Engine# Initialize the application passing the given group. By default, the# group is :defaultdefinitialize!(group=:default)#:nodoc:raise"Application has been already initialized."if@initializedrun_initializers(group,self)@initialized=trueselfendendend
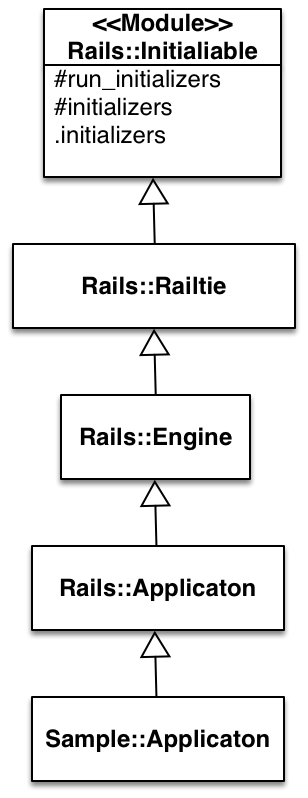
we can see that it just calls the run_initializers method, this method is actually an instance method in a module called Rails::Initializable. The Rails::Application has following hirarchy,
At the bottom is our Sample::Application class defined in config/application.rb. Its super class is Rails::Application which inherits from Rails::Engine. And Rails::Engine’s parent is Rails::Railtie. The Rails::Railtie includes the module Rails::Initializable. The run_initializers method is defined in that module. The Railtie is to manage the initialization and configuration of each module. In Rails each module such as Active Record, Active Support has its own Railtie class which inherits from Rails::Railtie. After this blog you should understand the main functionality of the Railtie.
Let’s have a look at the module Rails::Initializable. This module provides a set of methods to manage the order of initialization.
moduleRailsmoduleInitializabledefself.included(base)#:nodoc:base.extendClassMethodsenddefrun_initializers(group=:default,*args)returnifinstance_variable_defined?(:@ran)initializers.tsort_eachdo|initializer|initializer.run(*args)ifinitializer.belongs_to?(group)end@ran=trueenddefinitializers@initializers||=self.class.initializers_for(self)endmoduleClassMethodsdefinitializers@initializers||=Collection.newenddefinitializers_chaininitializers=Collection.newancestors.reverse_eachdo|klass|nextunlessklass.respond_to?(:initializers)initializers=initializers+klass.initializersendinitializersenddefinitializers_for(binding)Collection.new(initializers_chain.map{|i|i.bind(binding)})enddefinitializer(name,opts={},&blk)raiseArgumentError,"A block must be passed when defining an initializer"unlessblkopts[:after]||=initializers.last.nameunlessinitializers.empty?||initializers.find{|i|i.name==opts[:before]}initializers<<Initializer.new(name,nil,opts,&blk)endendendend
If a class includes this module, it can call the class method initializer to register a initializer to a class instance variable @initializers. This method accepts three parameters: the name, an option hash which you can define the order of the initializer, and a block, this block accepts one parameter which is normally our Rails.application instance.
Let’s check the definition of the Initializer class.
In the initialize method, it accepts a context object, notice that in Rails::Initializable, the initializer class method pass context as nil. But later a initializer could call bind to generate a new initializer with the context bind to an object. So if a class includes Rails::Initializable, its @initializers class instance variable contains a list of initializer templates. And these initializer templates could be instantiated by bind to a context object. And then pay attention that when a class includes Rails::Initializable module, it also has a initializers instance method, this method actually gets all initializer templates from itself and its ancestors and pass itself as the context.
Let’s write some classes to verify how Rails::Initializable works. I created a file parent.rb in app/models which has following contents,
1234567891011121314151617181920212223242526
# app/models/parent.rbclassParentincludeRails::Initializableinitializer'config2'doconfig2endinitializer'config1',before:'config2'doconfig1enddefconfig2puts"config2 in #{self.class}"enddefconfig1puts"config1 in #{self.class}"enddefinspect'parent'endend
This class Parent is a normal class which includes Rails::Initializable. Two initializers are defined: config2 and config1. Although we defined config1 after config2, but we passed before: 'config2' when initialize config1.
Now let’s open a rails console. The Parent should have a class method which returns all initializers. Let’s print the names of the initializers.
1234
andywang@Andys-MacBook-Pro sample$ rails c
Loading development environment (Rails 4.2.0.beta1)
2.0.0-p353 :001 > Parent.initializers.map(&:name)
 => ["config2", "config1"]
And the initializers in the class act as a template, their instance variable @context is nil. Let’s verify that by printing the @context instance variable, we can see they are nil.
Just now we said that the initializers in the class are like a template, and for the initializers in the object instance, we can think that the initializers are instantiated by setting the @context instance variable. We can verify that by printing the instance variable of all initializers.
We can see that the @context has been set to the parent object.
And if we call the run_initializers method,
1234
2.0.0-p353 :013 >   parent.run_initializers
config1 in Parent
config2 in Parent
 => true
Notice two things here, first the config1 is executed before the config2. And secondly notice why we can call the config1 and config2 methods in the initializer block? Because when the initializers are run, the self object in the block is set to the @context instance variable. Since our context object is parent, and config1 and config2 are instance methods of this object, of course we can call it.
Now let’s create a subclass Child1 which inherits from Parent, and in this class it defines another initializer whose name is config_in_child1.
123456789101112
# app/models/child1.rbclassChild1<Parentinitializer'config_in_child1',after:'config2'doputs"config in child1"enddefinspect"child1"endend
Let’s restart our console and try to create an instance of Child1 and call run_initializers.
123456789
andywang@Andys-MacBook-Pro sample$ rails c
Loading development environment (Rails 4.2.0.beta1)
2.0.0-p353 :001 > child1 = Child1.new
 => child1
2.0.0-p353 :002 > child1.run_initializers
config1 in Child1
config2 in Child1
config in child1
 => true
We can see that when an instance run its initializers, it will run the initializers in its ancestors first, from top to bottom. Here the two initializers config1 and config2 are executed first, then it’s config_in_child1 in Child1 class.
Now let’s create another class Child2 also has an initializer, similar as Child1.
123456789101112
# app/models/child2.rbclassChild2<Parentinitializer'config_in_child2',after:'config2'doputs"config in child2"enddefinspect"child2"endend
And then let’s create one App class which combines one instance of Child1 and Child2.
This class has two instance variables @child1 and @child2, which is an instance of Child1 and Child2 separately. This class also includes Rails::Initializable, but it overrides the initializers method to return the intializers of both @child1 and @child2. Now let’s open a new rails console, and create one instance of App and call run_initializers.
123456789101112
andywang@Andys-MacBook-Pro sample$ rails c
Loading development environment (Rails 4.2.0.beta1)
2.0.0-p353 :001 > app = App.new
 => #<App:0x007fed06691540 @child1=child1, @child2=child2>
2.0.0-p353 :002 > app.run_initializers
config1 in Child1
config1 in Child2
config2 in Child1
config2 in Child2
config in child1
config in child2
 => true
We can see that when we run app.run_initializers, it runs all initializers in @child1 and @child2. And also the order is maintained. All config1 initializers are executed before config2 initializers.
The Rails::Application class also overrides the initializers method like the App class above. It maintains a list of Railties and run the Rails.application.initialize! method is called, it run all Railties’ initializers.
And we could open a rails console to display all initializers and its associated binding context.
This is a very long list. Actually by default there is 108 initializers. If you are interested you can check the Rails source code to see which initializer does what. For example, the :set_load_path is to set the $LOAD_PATH global. So each engine has a chance to modify the load path.
So after this blog you should have a general idea what Rails has done when it calls Rails.application.initialize!
Recently I’m reading the Rails source code and I wanna create a series of blogs to talk about it. Today I’m going to introduct the initialization process of Rails. Just notice that I use the latest Rails 4.2.0 beta1 code for analysis. If you use Rails 4.1 or earlier, the code may be different (actually it is).
bin/rails
When we run rails s in a Rails application folder, it will call into the bin/rails script. This script has following contents,
Firstly it tries to call the spring script which is an application preloader to speed up development by keeping our application in the background. And then it defines the APP_PATH constant, which points to the <app_root>/config/application, and next it requires the config/boot.rb.
config/boot.rb
The config/boot.rb has following contents,
123
ENV['BUNDLE_GEMFILE']||=File.expand_path('../../Gemfile',__FILE__)require'bundler/setup'# Set up gems listed in the Gemfile.
Since Rails uses Bundler to manage the rubygems, it defines a Gemfile which declares all dependencies of the application. The ENV['BUNDLE_GEMFILE'] is set to the path of this Gemfile, and require 'bundler/setup' is calling Bundler to resolve the load paths of your Gem dependencies.
rails/command.rb
The rails next requires ‘rails/commands’, and let’s have a look at that file,
We can see that when we pass s or server to the rails script, it will set command to server and then create an instance of Rails::CommandsTasks and call its run_command! instance method.
rails/commands/commands_tasks.rb
The rails/commands/commands_tasks defines the Rails::CommandsTasks class, let’s check the important part of this class,
# rails/railties/lib/rails/commands/commands_tasks.rbmoduleRailsclassCommandsTasksattr_reader:argvCOMMAND_WHITELIST=%w(plugin generate destroy console server dbconsole runner new version help)definitialize(argv)@argv=argvenddefrun_command!(command)command=parse_command(command)ifCOMMAND_WHITELIST.include?(command)send(command)elsewrite_error_message(command)endendprivatedefparse_command(command)casecommandwhen'--version','-v''version'when'--help','-h''help'elsecommandendendendend
In the run_command! instance method, it checks that if the COMMAND_WHITELIST includes the command passed, then it will just invoke an instance method whose method name matches the command parameter. So in our case, if we passed server it will invoke the server method, which we show below,
1234567891011121314151617181920
# rails/railties/lib/rails/commands/commands_tasks.rbmoduleRailsclassCommandsTasksdefserverset_application_directory!require_command!("server")Rails::Server.new.tapdo|server|# We need to require application after the server sets environment,# otherwise the --environment option given to the server won't propagate.requireAPP_PATHDir.chdir(Rails.application.root)server.startendendendend
We can see that it creates a Rails::Server instance and then require our application file which is already defined in APP_PATH.
Let’s first have a look at the config/application.rb
config/application.rb
The config/application.rb has following contents,
123456789101112131415161718192021222324252627
# config/application.rbrequireFile.expand_path('../boot',__FILE__)require'rails/all'# Require the gems listed in Gemfile, including any gems# you've limited to :test, :development, or :production.Bundler.require(*Rails.groups)moduleSampleclassApplication<Rails::Application# Settings in config/environments/* take precedence over those specified here.# Application configuration should go into files in config/initializers# -- all .rb files in that directory are automatically loaded.# Set Time.zone default to the specified zone and make Active Record auto-convert to this zone.# Run "rake -D time" for a list of tasks for finding time zone names. Default is UTC.# config.time_zone = 'Central Time (US & Canada)'# The default locale is :en and all translations from config/locales/*.rb,yml are auto loaded.# config.i18n.load_path += Dir[Rails.root.join('my', 'locales', '*.{rb,yml}').to_s]# config.i18n.default_locale = :de# For not swallow errors in after_commit/after_rollback callbacks.config.active_record.raise_in_transactional_callbacks=trueendend
Firstly it requires the config/boot.rb, since above this file is already required by rails script, the require has no effect here.
Next it requires the ‘rails/all’, this file has following contents, it just load the railtie of each module. Each module has its own railtie, which is to manage the initialization and configuration. We will talk about railties in another blog so I’ll not explain here.
And then next it requires the gems we defined in Gemfile by calling Bundler.require. And next our application class is defined. Since I named my application as sample, the class is in Sample Module.
The Sample::Application extends from Rails::Application. After this class is defined the Rails.application will be set to an instance of Sample::Application. Why? Let’s have a look at Rails module.
We can see that it defines two instance variables in Rails’s singleton class, @application and @app_class. And after the app_class is defined, the Rails.application returns the @application if it’s already defined, if not, it will call app_class.instance to create an instance.
So when does the Rails.app_class is defined? Let’s have a look at the Rails::Application class.
We can see that if there is a class inherits it, it will set the Rails.app_class to the inherited class, in our case Sample::Application. So after class Sample::Application is defined, the Rails.app_class is set, and then if we call Rails.application, the application instance will be initialized.
Notice that the new method in Rails::Application is set to private, so we can only call instance to generate an instance. And this instance is a singleton, which is reasonable since one Rails application should have only one application instance.
Rails::Server
After the application instance is instantiated, we go back to Rails::CommandsTasks#server method, it will call Dir.chdir(Rails.application.root) to go to application root folder, and then call server.start. Let’s have a look how the Rails::Server is defined.
# rails/railties/lib/rails/commands/server.rbmoduleRailsclassServer<::Rack::Serverdefinitialize(*)superset_environmentenddefstartprint_boot_informationtrap(:INT){exit}create_tmp_directorieslog_to_stdoutifoptions[:log_stdout]superensure# The '-h' option calls exit before @options is set.# If we call 'options' with it unset, we get double help banners.puts'Exiting'unless@options&&options[:daemonize]end# TODO: this is no longer required but we keep it for the moment to support older config.ru files.defapp@app||=beginapp=superapp.respond_to?(:to_app)?app.to_app:appendendendend
We can see that Rails::Server extends from ::Rack::Server. Rack is a specification which defines an interface between the web server and application. To support Rack, you need to define an app object, it has a call method, which takes the environment hash as a parameter, and returning an Array with three elements:
The HTTP response code
A Hash of headers
The response body, which must respond to each
Although this interface is very simple, you can configure middleware around the app and intercept the request and response.
Rack is also a rubygem. It provides a set of middleware such as logging, set content length in HTTP response, etc. And it also defines a simple DSL to configure the middleware and app, the config file has ru extension and Rack will load a file called config.ru by default.
moduleRackclassServerattr_writer:optionsdefinitialize(options=nil)@options=options@app=options[:app]ifoptions&&options[:app]enddefapp@app||=options[:builder]?build_app_from_string:build_app_and_options_from_configenddefstart&blk# ...server.runwrapped_app,options,&blkenddefserver@_server||=Rack::Handler.get(options[:server])||Rack::Handler.default(options)endprivatedefbuild_app_and_options_from_configif!::File.exist?options[:config]abort"configuration #{options[:config]} not found"endapp,options=Rack::Builder.parse_file(self.options[:config],opt_parser)self.options.merge!optionsappenddefbuild_app_from_stringRack::Builder.new_from_string(self.options[:builder])enddefwrapped_app@wrapped_app||=build_appappendendend
I only leave the relevant code here and omitted some parts such as option parsing. We can see that the start method creates a @_server instance variable which is a handler represents the web server interface, it has a run method which accepts the app. The app is the Rack app object we mentioned above, it’s an object which reponds to call method which accepts an environment hash and returns an array with 3 elements: the HTTP status code, response HTTP headers and the body.
The wrapped_app calls the build_app method which just wraps some default middleware around the app. And the app method actually sets the @app instance variable, which is actually read from the config.ru file (by build_app_from_string method).
config.ru
Every rails application has a config.ru file at root folder. Let’s have a look at that file,
1234
# This file is used by Rack-based servers to start the application.require::File.expand_path('../config/environment',__FILE__)runRails.application
This file is actually a ruby file, it first requires the config/environment.rb file and then calls run Rails.application. The run method is defined in Rack DSL, and it accepts the app object. So we can imagine that if we call Rails.application.respond_to?(:call) it should return true.
config/environment.rb
Let’s have a look what’s inside config/environment.rb.
12345
# Load the Rails application.requireFile.expand_path('../application',__FILE__)# Initialize the Rails application.Rails.application.initialize!
It just requires config/application.rb (which we already required) and then initialize the application by calling Rails.application.initialize!. After that the initialization process is finished and the Rails.application could be used as Rack application.
In this part we had a detailed look at the Rails initialization process and we will dig into Railties and Rails.application.initialize! in following series.
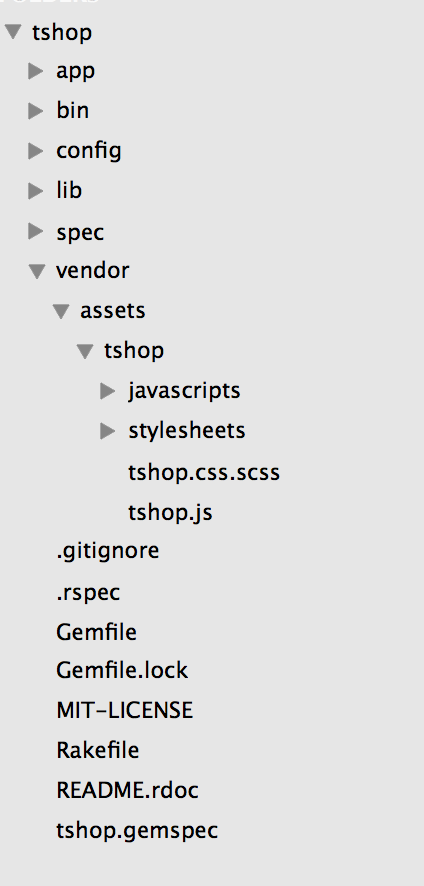
Recently I bought a website template from WrapBootstrap and I wanna itegrate this into a Spree website I’m working on. According to the documents of Asset Pipeline and the RailsCasts. I put the stylesheets and javascripts of this template into the folder #{Rails.root}/vendor/assets/tshop. So for example, I can access a stylesheet at #{Rails.root}/vendor/assets/tshop/stylesheets/style.css from the url http://localhost:3000/assets/stylesheets/style.css
My folder structure is like following figure,
According to the Rails documents, I should create a file index.js and index.css under #{Rails.root}/vendor/assets/tshop, but that doesn’t work for me. Actually I named the files as tshop.js and tshop.css.scss, as the figure above. So in the application.css and application.js I chould load the tshop library by calling,
123456
/*
 ...
 *= require tshop
 ...
 */
and
1
//= require tshop
And in the tshop.css.scss, I could load the file #{Rails.root}/vendor/assets/tshop/stylesheets/style.css by using following code,
123456
/*
 ...
 *= require stylesheets/style
 ...
 */
And in tshop.js, the file #{Rails.root}/vendor/assets/tshop/javascripts/script.js could be loaded by following code,
1
//= require javascripts/script
In the templates, I need to change the background image url, for example, in style.css,
This image file will be in #{Rails.root}/vendor/assets/tshop/stylesheets/parallax/people-collage.jpg.
Here are the organization I used for my Rails 4 application. The point is to use library.css and library.js to name the index files instead of index.css and index.js.
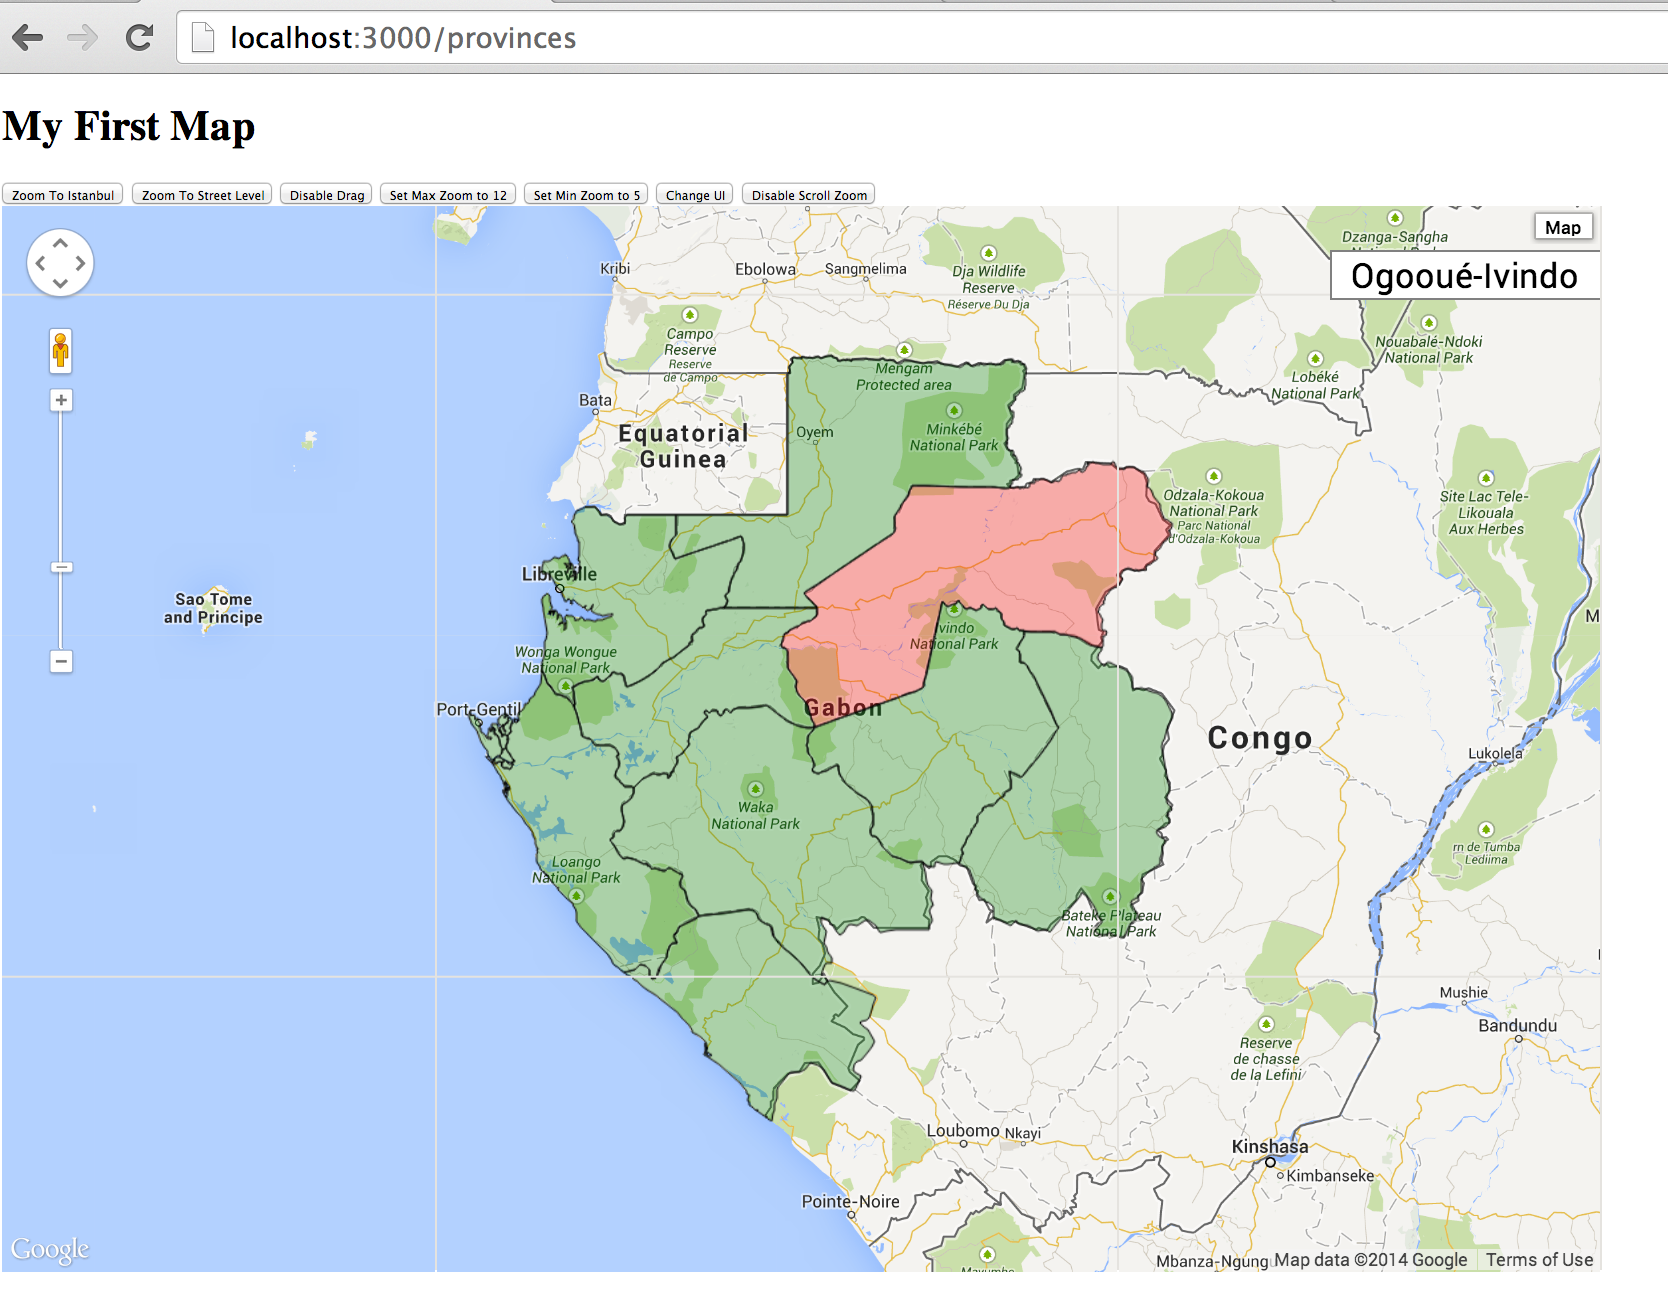
Here is the Part 2 of Integrate PostGIS and Google maps in Rails, in this part we will render the provinces of Gabon on Google map. Unlike Part 1 the GeoJSON data is fetched from a static file, in this part we will see how to fetch data from PostGIS and encode them into GeoJSON directly. The result is like the following figure, the 9 provinces are rendered on the map, and when the user put his mouse over one province, that area will be highlighted, and also on the top right there is a label which shows the name of the province that is highlighted.
Create the Province model
The first thing we need to do is to create a Province model. Like how we created the Country model in part 1, we create a Province model, and then import the data in shape file into our PostGIS database. The main part in the migration is as following,
1234567891011121314151617181920
classImportProvincesFromShp<ActiveRecord::Migrationdefupfrom_shp_sql=`shp2pgsql -c -g geom -W LATIN1 -s 4326 #{Rails.root.join('db','shpfiles','GAB_adm1.shp')} provinces_ref`Province.transactiondoexecutefrom_shp_sqlexecute<<-SQL insert into provinces(name, geom) select name_1, geom from provinces_ref SQLdrop_table:provinces_refendenddefdownProvince.delete_allendend
The province data is in shape file GAB_adm1.shp, and we fetch the province name and geometry from the shape file and import them into provinces table (In the shape file province name is stored as attribute name_1).
Encode the feature
Now we need to fetch data from database and encode them as GeoJSON. GeoJSON is a JSON format for encoding geographic data structures. The following example is stolen from the GeoJSON website. We can see that in addition to the geometry data, the JSON can also encode additional properties.
We will mainly use the rgeo-geojson gem to do the encoding. In rgeo-geojson gem, it converts a geometry type to a feature and then encode the feature to a hash, and then the hash can be rendered as a JSON.
We create a Concern named Featurable, which will add a featurable class method into the class which includes it. So for example in Province class, we include the Featurable like following,
The featurable accepts two parameters, the first is mandatory, which is the name of the attribute which contains the geometry data, the second parameter is an optional array of attribute names, when encoding it as GeoJSON, those attributes will be encoded as attributes. Here we encode the name attribute as the property of the feature. Now the Province class will have a instance method named to_feature, which returns a RGeo::GeoJSON::Feature.
Now let’s have a look at how Featurable is implemented.
123456789101112131415161718192021222324252627
moduleFeaturableextendActiveSupport::ConcernmoduleClassMethodsdeffeaturablegeom_attr_name,property_names=[]define_method:to_featuredofactory=RGeo::GeoJSON::EntityFactory.instanceproperty_names=Array(property_names)properties=property_names.inject({})do|hash,property_name|hash[property_name.to_sym]=read_attribute(property_name)hashendfactory.featureread_attribute(geom_attr_name),self.id,propertiesendend# turns a collection of models to a feature collection# All models in the collection should implement the to_feature methoddefto_feature_collectionmodelsfactory=RGeo::GeoJSON::EntityFactory.instancefeatures=models.map(&:to_feature)factory.feature_collectionfeaturesendendend
In the implementation of featurable class method, when this method is called, the class will call define_method to define an instance method called to_feature and from line 9 to 13 it will generates a hash named properties whose key is the property name and value is the property value. And then on line 14 it calls the RGeo::GeoJSON::EntityFactory#feature method to create the feature and return it.
On line 21 it defines another class method called to_feature_collection, this is to convert a collection of models to a feature collection, for example the following code shows how to encode all 9 provinces as a feature collection.
We can see that the index method responds to two formats, in the json format it will call Province.to_feature_collection to create the feature collection, and then calls RGeo::GeoJSON.encode(feature_collection) to encode the feature as a hash, and last calls render to render the hash as a JSON string.
In the views/provinces/index.html.erb, the main part is as following,
12345678910111213141516171819
//Create an info box for displaying namesvarinfoBox=document.createElement('div');infoBox.innerHTML="<div id='info-box'></div>";map.controls[google.maps.ControlPosition.RIGHT_TOP].push(infoBox);map.data.addListener('mouseover',function(event){map.data.revertStyle();$('#info-box').text(event.feature.getProperty('name'));map.data.overrideStyle(event.feature,{fillColor:'red'});});map.data.addListener('mouseout',function(event){map.data.revertStyle();});map.data.setStyle(function(feature){return{fillColor:'green',strokeWeight:1}});
From line 2 to line 4 it creates an info box at the RIGHT TOP to display province name. And from line 6 to line 10 it adds a mouseover event listener, so when the mouse is over the province region, it set the text of the info box to the name property of the feature. And on line 12 it defines a mouseout event listener so the style is reverted when the mouse is out of the province region.
So in this part we showed how to fetch geometry data from PostGIS database and render them on google map. The source code for this part is at github.
Recently I need to work on a Rails project which is to manage the public and private schools in Gabon, a small country in Africa. And I need to integrate PostGIS and Google maps. I will create a series of blogs to share what I have done, and I will point out some common gotchas while integrate Rails with PostGIS and Google maps.
Books and Blogs
To work on PostGIS and Google Maps of course you need to learn them. This series is not a complete tutorial. To study PostGIS, the definite reference is PostGIS in Action by Regina O. Obe and Leo S. Hsu. Currently the second edition is in MEAP state and you can buy the ebook at manning website. To study Google maps, the documentation at google website is already awesome, but if you prefer a book form, the book Google Maps JavaScript API Cookbook by Alper Dincer and Balkan Uraz is a good choice, which you can buy the kindle version at amazon
In the project to integrate PostGIS with Rails, I utilized some rubygems from RGeo. The original author of those rubygems, Daniel Azuma, has created a series of articles on his website, which is very helpful. Actually this series has been inspired from his works.
Let’s start
In this first blog I’ll describe how to create a rails project and how to create migrations to import GIS data from shape files to our database.
Install
To work on PostGIS of course you need to install it first. If you work on a Mac OS environment like me, using the PostgreSQL App is the easiest way. This package already includes PostGIS 2.1, so you just need to enable it, which we will introduce later.
And since we use the RGeo and some of its addons, you need to install GEOS and Proj, which RGeo depends on. For Mac users the easiest way is to install the frameworks here
Create the application
Now let’s create a rails application and use PostgreSQL database (I use Rails 4.1).
1
$ rails new schoolpro --database==postgresql
Here my application name is schoolpro. Now open the Gemfile and add the activerecord-postgis-adapter gem.
1
gem'activerecord-postgis-adapter'
And then in the database.yml, let’s change the adapter from postgresql to postgis
1
adapter:postgis
Now let’s create the database by running rake db:create
1
$ rake db:create
After the database is created, we need to enable the PostGIS extension by running following command
Recently I bought a new MacBook Pro Retina with Mevericks installed. And here are the steps that I configure the development environment for PostgreSQL on this OS for my Ruby on Rails projects.
Download Postgres App
Download the Postgres App here, which is the quickest way to install PostgreSQL on Mac OS. My version is the latest version Postgres93.
Install XCode command line tools
Install XCode, and in the menu XCode –> ‘Open Developer Tool’ –> ‘More Developer Tool’, Choose the ‘Command Line Tools(OS X Mavericks) for Xcode’, download the dmg file and install it.
Building native extensions.  This could take a while...
ERROR:  Error installing pg:
  ERROR: Failed to build gem native extension.

    /Users/andywang/.rvm/rubies/ruby-2.0.0-p353/bin/ruby extconf.rb
checking for pg_config... no
No pg_config... trying anyway. If building fails, please try again with
 --with-pg-config=/path/to/pg_config
checking for libpq-fe.h... no
Can't find the 'libpq-fe.h header
*** extconf.rb failed ***
Could not create Makefile due to some reason, probably lack of necessary
libraries and/or headers.  Check the mkmf.log file for more details.  You may
need configuration options.

Provided configuration options:
  --with-opt-dir
  --with-opt-include
  --without-opt-include=${opt-dir}/include
  --with-opt-lib
  --without-opt-lib=${opt-dir}/lib
  --with-make-prog
  --without-make-prog
  --srcdir=.
  --curdir
  --ruby=/Users/andywang/.rvm/rubies/ruby-2.0.0-p353/bin/ruby
  --with-pg
  --without-pg
  --with-pg-config
  --without-pg-config
  --with-pg_config
  --without-pg_config
  --with-pg-dir
  --without-pg-dir
  --with-pg-include
  --without-pg-include=${pg-dir}/include
  --with-pg-lib
  --without-pg-lib=${pg-dir}/


Gem files will remain installed in /Users/andywang/.rvm/gems/ruby-2.0.0-p353/gems/pg-0.17.0 for inspection.
Results logged to /Users/andywang/.rvm/gems/ruby-2.0.0-p353/gems/pg-0.17.0/ext/gem_make.out
Create role in PostgreSQL
Normally I want to create a specific role in the database and don’t like the anonymous access. So in my database.yml, I have the following snippets,