Recently I need to call Google Content API to access Google Merchant Center by using Ruby. I googled on the internet but didn’t find useful links, and also the google-api-client gem doesn’t contain a lot of examples. Thanks David Tzau for his excellent blog, however he uses Python, and in this blog I will show how to call Google Content API by using Ruby.
Create the Client ID for a Service Account
In my application I will use Service Account, which means that the application doesn’t redirect to the Google login page and asks the user to login, instead the application calls the Content API on behalf of the Service Account. This step is the same as David’s blog, so I’ll copy & paste here shamelessly.
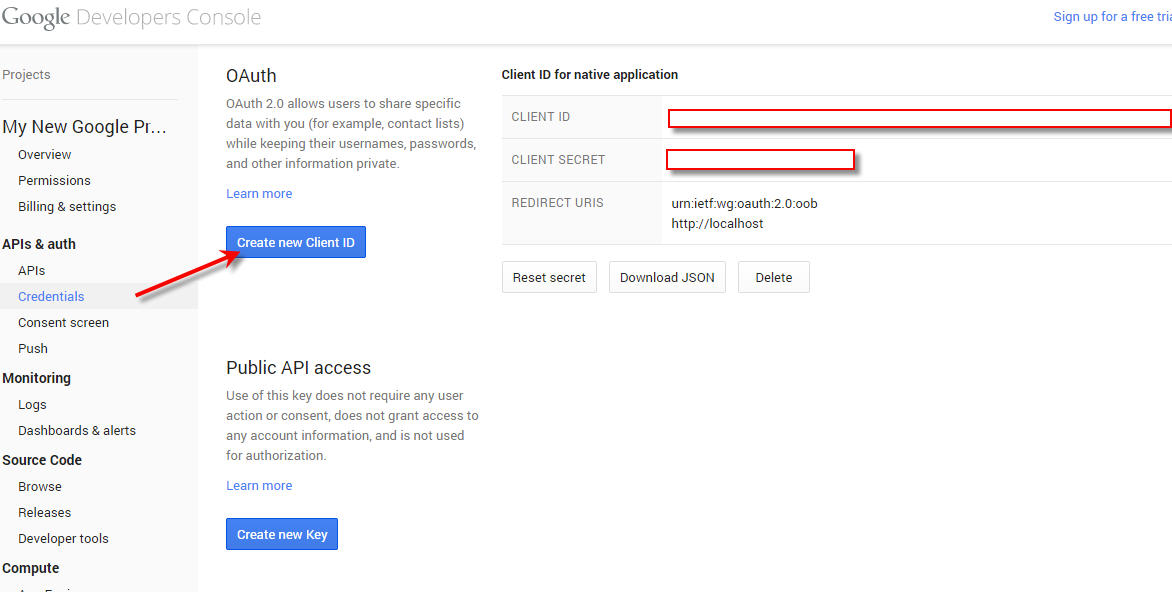
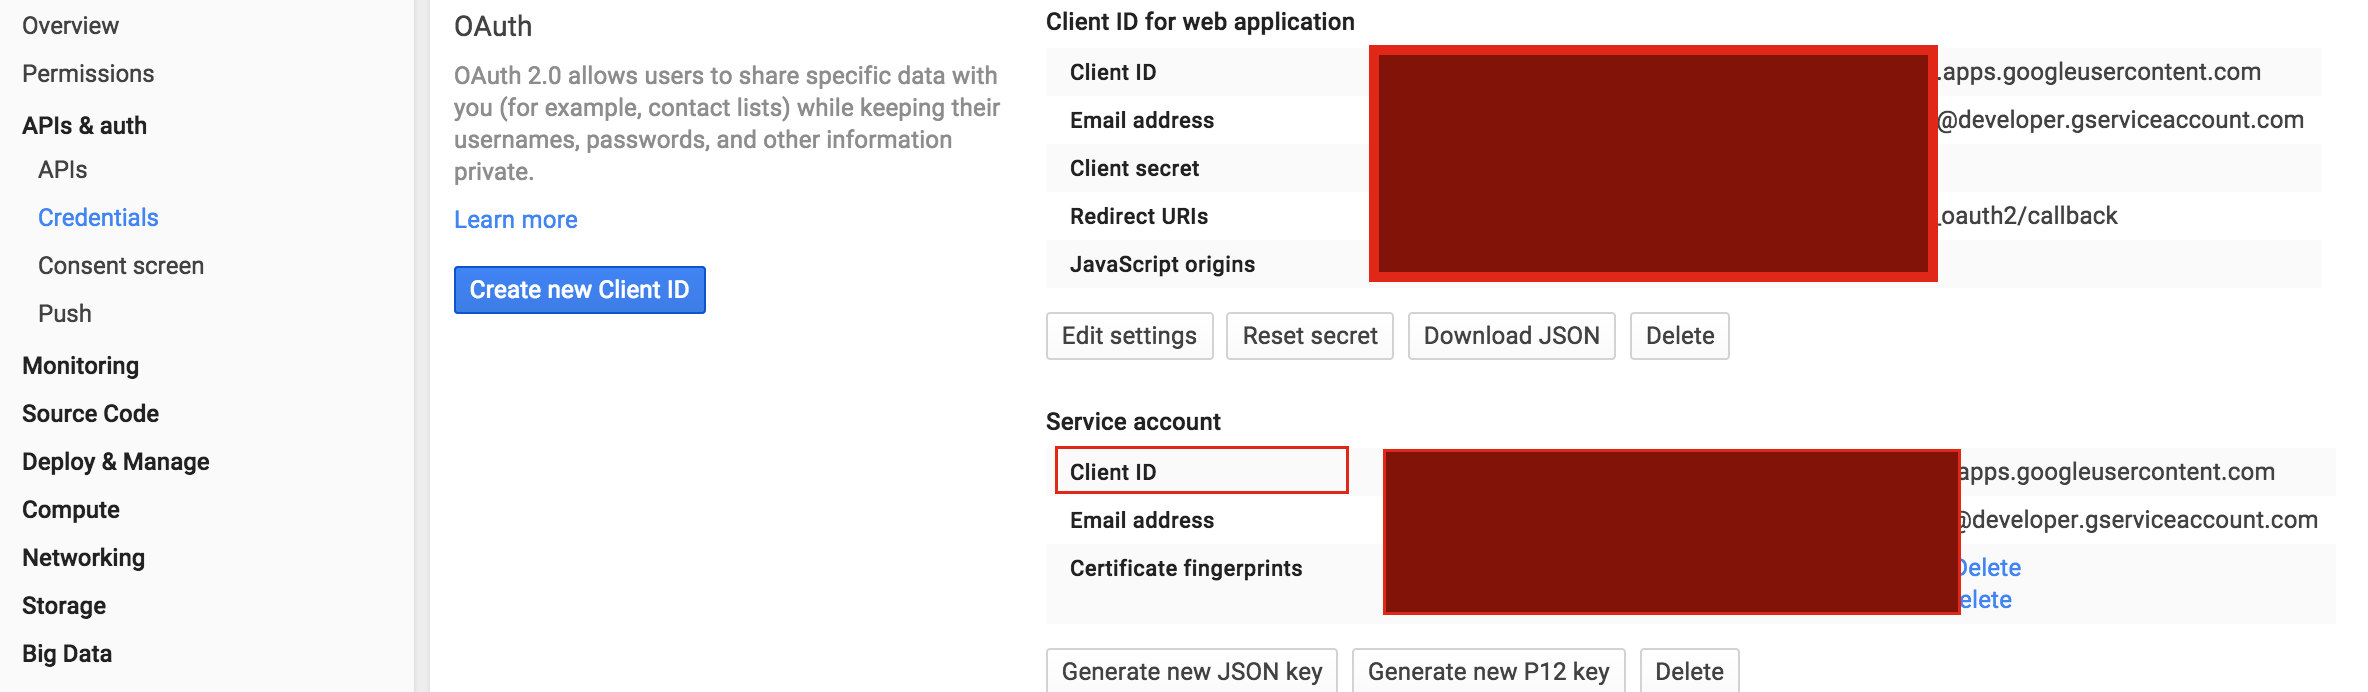
So let’s create a Service Account in Google Developer Console. Go to the Google Developer Console and navigate to the “Credentials” menu under “API’s and Auth”. From there click on “Create new Client ID”:
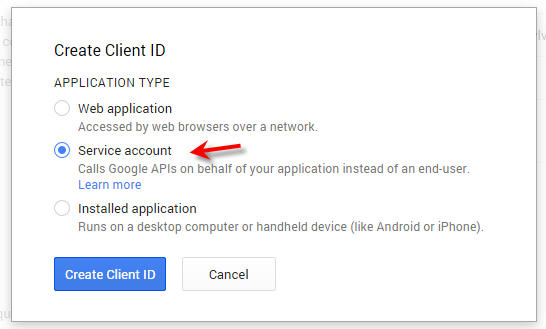
Select the “Service Account” option:
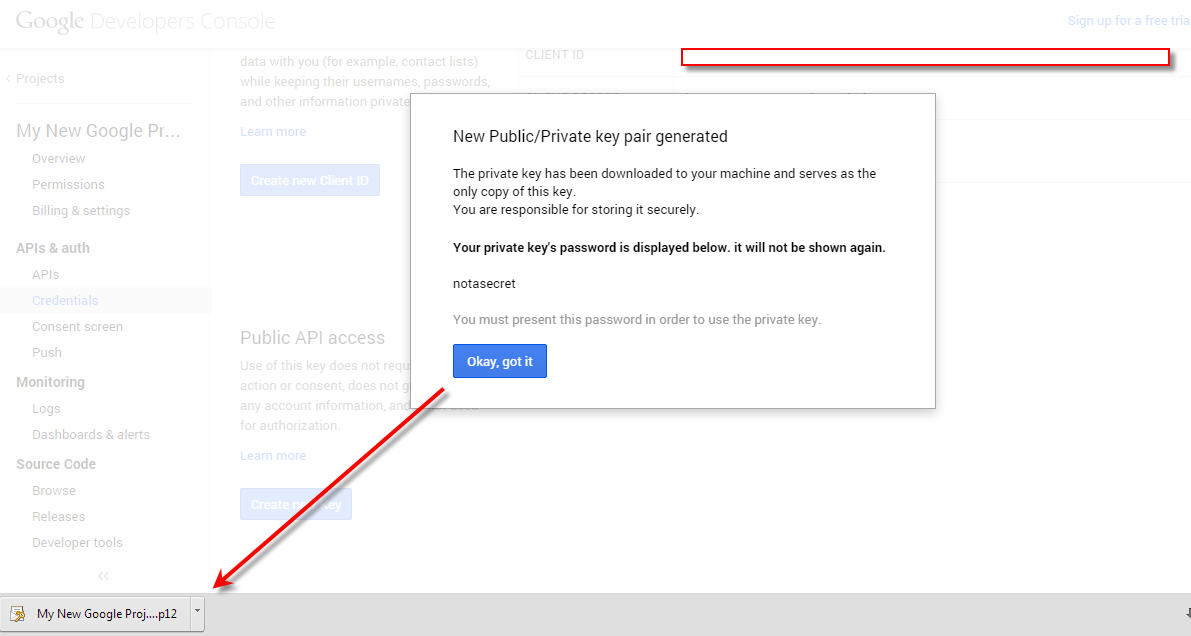
As soon as you create the Service Account, the system will generate a Client ID, email address, and a public/private key pair. The private key is immediately downloaded to your browser. Save this private key safely somewhere. There is a password that comes with this private key that you will need later. The password is “notasecret” and is the same for every private key that is generated.
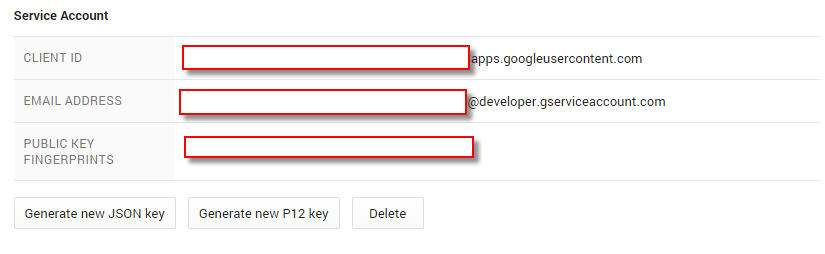
You will notice a client ID and email address are also created for the Service Account you just created. Make note of the email address as you will need this later:
Granting Permissions inside Google Merchant Center for the Client ID
This next step is very important and is not called out very clearly in Google’s documentation and is very easy to miss. Just because you can digitally sign JWT’s and Google’s authentication server can verify your application is calling on behalf of the Service Account, it doesn’t mean your application can access just any account’s data behind the API whether that be Google Analytics, Google Merchant Center, Adwords, etc. In this example we are going have our program call the Content API for Shopping to retrieve a product from the corresponding Google Merchant Center account.
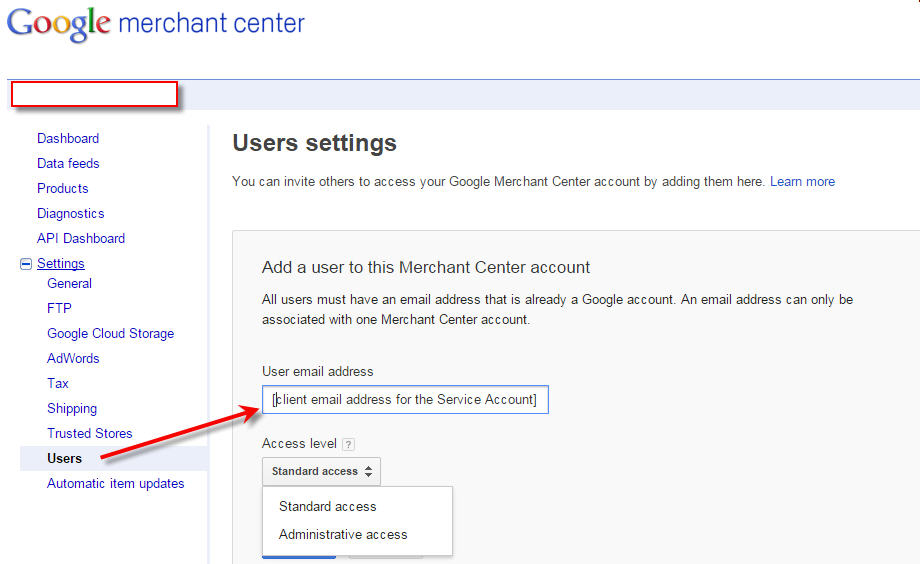
Login to the corresponding Google Merchant Center Account and navigate to the “Users” menu under “Settings”. Enter the Service Account email address here and grant it “Standard” access.
Add google-api-client Gem
To calling Google Content API, we need to add google-api-client Gem into our Gemfile.
1
gem"google-api-client"
And then run bundle install
Get Google::APIClient
To calling Google Content API, we need an Google::APIClient instance.
Remember the private key file we downloaded when we create the Service Account? I saved the file in #{Rails.root}/config with file name content_api.p12 (If your repository is an open source repository, you should not put this file in your repository as it’s very sensitive).
On line 1, it load the key from the content_api.p12, and on line 3 it creates an asserter instance. The ENV[‘GOOGLE_CONTENT_API_CLIENT_ID’] is the Client ID as indicated in the following snapshot. Also you should not put this information in your repository if your repository is public. For my project I put it in a yml file and when the application loads, it will set the key/value in the yml file as environment variables.
On line 6 it creates a Google::APIClient instance, and on line 9 it sets the authorization.
On line 10, it calls client.discovered_api to get the content api, we will use this object to dictate which api we will call when we call the api, as will show in following sections.
Calling Content API
Request
To call Google Content API, normally we would call the Google::APIClient#execute method. This method accepts a Hash parameter, and the Hash normally contains the following options,
:api_method
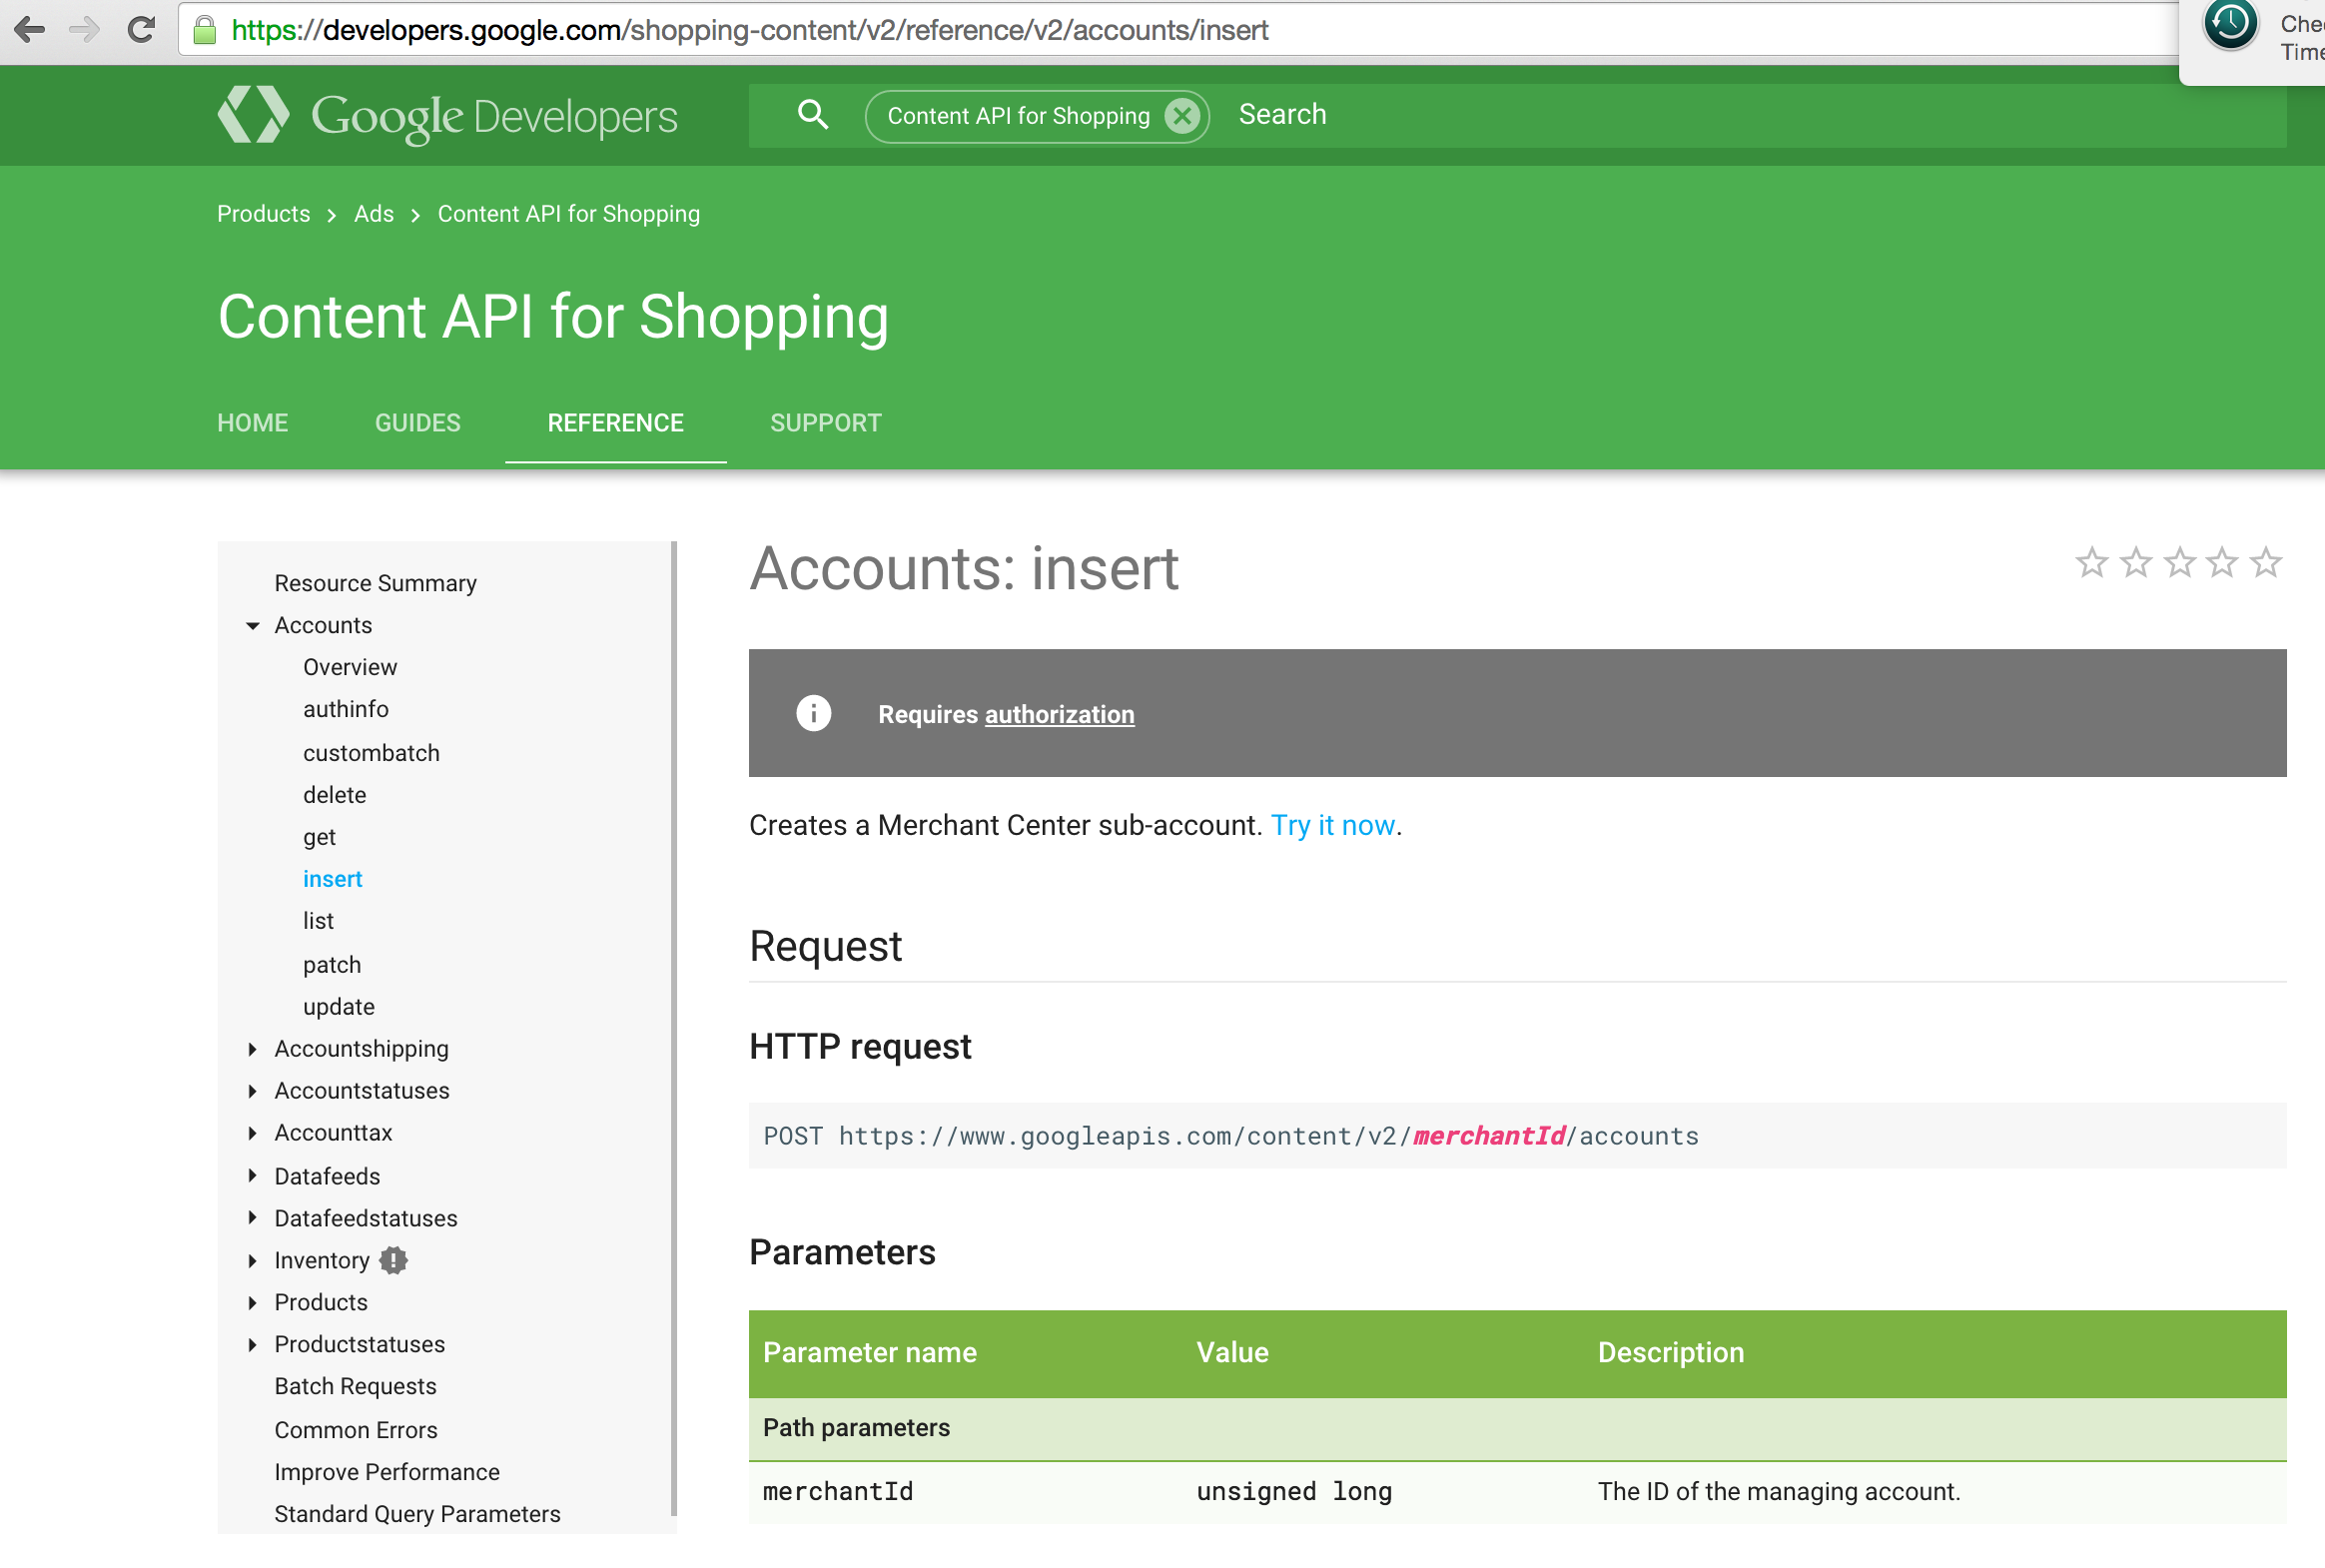
The :api_method indicates which API we would like to call. Normally we set this option by calling the content object we got above. To know which API to call, take a look at the Google Content API reference.
For example, to call the Accounts: insert API, as the figure below, we should set :api_method to content.accounts.insert
:parameters
The parameters should be a hash, it indicates the path parameters in the request URL, for example, the Accounts: insert API expects a merchantId param, so to call this API, it should set the parameters to { :merchantId => merchant_id }. Notice that the parameter key is camel case, which doesn’t conform to Ruby convention.
:body_object
If the API contains a body, we should put the body in the :body_object option. The :body_object should be a Hash, what it contains depends on the specific API.
For example, to create an Account with name ‘my_account’, we should set the :body_object as a hash like this,
:body_object => { :name => ‘my_account’ }
Response
When call the execute method, it returns us a response, we should call response.data? to check if the response contains any data. And if the API is failed, we can check response.data[‘error’]. If the API calling is successful, we can check the documentation to see what the response data contains.For example, for Accounts Insert, if successful it will returns a Accounts resource, so we can call response.data[‘id’] to get the ID of the created Account.
Examples
Now we give some examples as following. In the examples, the client is a Google::APIClient instance. Normally you should wrap this client instance in a class, and make the methods as instance methods of the class.
Create Merchant Center sub-Account
To create a sub-Account, and also give an email as the admin, we will call the following API,
In this part we will continue our exploration of how Rails finds your templates. If you need a refresh, here is Part1, Part 2 and Part 3.
In last part we saw that ActionView::LookupContext#find_template is just a delegation to ActionView::PathSet#find. So let’s check what ActionView::PathSet#find is doing.
ActionView::PathSet
From the class name of PathSet we can get an idea that this class is to manage a set of pathes, where the templates are stored. Let’s have a look at the definition of this class.
moduleActionView#:nodoc:# = Action View PathSet## This class is used to store and access paths in Action View. A number of# operations are defined so that you can search among the paths in this# set and also perform operations on other +PathSet+ objects.## A +LookupContext+ will use a +PathSet+ to store the paths in its context.classPathSet#:nodoc:includeEnumerableattr_reader:pathsdelegate:[],:include?,:pop,:size,:each,to::pathsdefinitialize(paths=[])@paths=typecastpathsenddeffind(*args)find_all(*args).first||raise(MissingTemplate.new(self,*args))enddeffind_all(path,prefixes=[],*args)prefixes=[prefixes]ifString===prefixesprefixes.eachdo|prefix|paths.eachdo|resolver|templates=resolver.find_all(path,prefix,*args)returntemplatesunlesstemplates.empty?endend[]enddefexists?(path,prefixes,*args)find_all(path,prefixes,*args).any?endprivatedeftypecast(paths)paths.mapdo|path|casepathwhenPathname,StringOptimizedFileSystemResolver.newpath.to_selsepathendendendendend
We can see that the initialize method accepts a paths param, which is normally an array of strings. And in initialize method, it will call the typecast the paths and then store the typecasted value in @paths instance variable
for each element in the paths, the typecast method will convert it to an OptimizedFileSystemResolver instance.
The find_all method will interate each resolver instance in paths and return the first value which is not empty
The find method just delegates to find_all method, if it can’t find a template, it will raise MissingTemplate exception.
In LookupContext class, we can see how the ActionView::PathSet instance is created.
moduleActionViewclassLookupContext# Helpers related to template lookup using the lookup context information.moduleViewPathsattr_reader:view_paths# Whenever setting view paths, makes a copy so that we can manipulate them in# instance objects as we wish.defview_paths=(paths)@view_paths=ActionView::PathSet.new(Array(paths))endendincludeViewPathsendend
The view_paths= method is defind in module ActionView::LookupContext::ViewPaths and ActionView::LookupContext includes this module. We can see that the when calling view_paths= method, an instance of ActionView::PathSet will be created and set to the @view_paths instance variable of ActionView::LookupContext.
So how this view_paths= method is called? It’s in ActionView::LookupContext#initialize method.
So the view_paths is passed to ActionView::LookupContext instances in initialize. And in ActionView::ViewPaths it initializes ActionView::LookupContext.
moduleActionViewmoduleViewPathsextendActiveSupport::Concernincludeddoclass_attribute:_view_pathsself._view_paths=ActionView::PathSet.newself._view_paths.freezeend# LookupContext is the object responsible to hold all information required to lookup# templates, i.e. view paths and details. Check ActionView::LookupContext for more# information.deflookup_context@_lookup_context||=ActionView::LookupContext.new(self.class._view_paths,details_for_lookup,_prefixes)enddefappend_view_path(path)lookup_context.view_paths.push(*path)enddefprepend_view_path(path)lookup_context.view_paths.unshift(*path)endmoduleClassMethods# Append a path to the list of view paths for this controller.## ==== Parameters# * <tt>path</tt> - If a String is provided, it gets converted into# the default view path. You may also provide a custom view path# (see ActionView::PathSet for more information)defappend_view_path(path)self._view_paths=view_paths+Array(path)end# Prepend a path to the list of view paths for this controller.## ==== Parameters# * <tt>path</tt> - If a String is provided, it gets converted into# the default view path. You may also provide a custom view path# (see ActionView::PathSet for more information)defprepend_view_path(path)self._view_paths=ActionView::PathSet.new(Array(path)+view_paths)end# A list of all of the default view paths for this controller.defview_paths_view_pathsendendend
This ActionView::ViewPaths will be included in a controller class. We can see that by default the view_paths is an empty array. But it provides append_view_path and prepend_view_path to add a view path at the end or the front of view paths. Notice that the prepend_view_path and append_view_path are defined both as class methods and instance methods.
So how the view path is initialized? Actually it’s in Rails::Engine class.
a initializer defines a code block which will be called during application startup. So when load :action_controller it will call prepend_view_path and the view_paths contains only one element, which is the app/views folder in your rails application.
OptimizedFileSystemResolver
Now understand how ActionView::PathSet is initialized, and we also know that in find method it actually delegates to the resolver. So let’s see how the resolver implements the method.
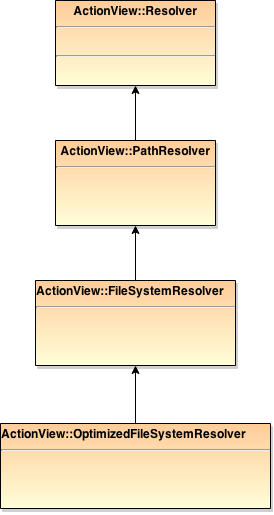
The Resolver is to resolve a template when passing the details. The class relationship is as the above diagram,
We can see that by default the resolver used in ActionView::PathSet, which is ActionView::OptimizedFileSystemResolver, extends from ActionView::FileSystemResolver, which in terms extends from ActionView::PathResolver, which extends from ActionView::Resolver, which is the base class for all resolvers.
The base class ActionView::Resolver provides some common functionalities such as caching for all sub-class resolvers. However here I will focus on ActionView::PathResolver, which implements the logic how to find a template in a path.
moduleActionViewclassPathResolver<ResolverEXTENSIONS={:locale=>".",:formats=>".",:variants=>"+",:handlers=>"."}DEFAULT_PATTERN=":prefix/:action{.:locale,}{.:formats,}{+:variants,}{.:handlers,}"definitialize(pattern=nil)@pattern=pattern||DEFAULT_PATTERNsuper()endprivatedeffind_templates(name,prefix,partial,details)path=Path.build(name,prefix,partial)query(path,details,details[:formats])enddefquery(path,details,formats)query=build_query(path,details)template_paths=find_template_pathsquerytemplate_paths.map{|template|handler,format,variant=extract_handler_and_format_and_variant(template,formats)contents=File.binread(template)Template.new(contents,File.expand_path(template),handler,:virtual_path=>path.virtual,:format=>format,:variant=>variant,:updated_at=>mtime(template))}enddeffind_template_paths(query)Dir[query].reject{|filename|File.directory?(filename)||# deals with case-insensitive file systems.!File.fnmatch(query,filename,File::FNM_EXTGLOB)}end# Helper for building query glob string based on resolver's pattern.defbuild_query(path,details)query=@pattern.dupprefix=path.prefix.empty??"":"#{escape_entry(path.prefix)}\\1"query.gsub!(/\:prefix(\/)?/,prefix)partial=escape_entry(path.partial??"_#{path.name}":path.name)query.gsub!(/\:action/,partial)details.eachdo|ext,variants|query.gsub!(/\:#{ext}/,"{#{variants.compact.uniq.join(',')}}")endFile.expand_path(query,@path)enddefescape_entry(entry)entry.gsub(/[*?{}\[\]]/,'\\\\\\&')endendend
The most important methods are build_query and find_template_paths.
The PathResolver will use a pattern to search templates in path, and by default the pattern is DEFAULT_PATTERN
build_query: This method is to build a query from the path and details. Remember in last part, ActionView::AbstractRenderer#extract_details will extract details from options. For example, for an index action in Articles controller, the query will be
articles/index{.en,}{.html,}{+:variants,}{.haml,}
For this query, in find_template_paths it will call Dir[query], which is actually an alias to glob which is to expand the query. For example, for the above query, {p, q} matchs either p, or q. So for example for {.en,} it could either match .en or an empty string. So if we define a template articles/index.html.haml, it will match the query. For more information, consult Ruby doc.
So for each matched template, in query method it will create a Template to wrap the template file.
Summary
So in summary here we can see that the flow for Rails to find a template is as following,
Rails initializes a set of Paths for resolve templates, by default it contains only one path app/views
When an action of a controller is accessed, the render will be called either explicitly or implicitly.
Rails will extract the prefixes, action and some details from the options passed to render,
Rails find the template by search in the path set using a query composed from prefixes, action and details.
Before I worked in a large company which has its own DBAs. Yes I know SQL,I know Stored Procedures and I think I know something about indexes, but for database performance tuning, we always delegate the task to the DBA. And currently I work in a small company which doesn’t have a specific DBA role, so developers have to be DBA (Full Stack right?). So for learning something about database performance tuning, I bought this book. Oh I really love it and I learned so many things in one week!
This book talks about indexes and only one type of indexes: B-Tree. It firstly starts with the basics of index and the WHERE clause. And then proceed to join, clustering, sorting and grouping, and also partial results and modifying data. After reading this book, you should have a firm understanding how indexes work and I’m sure that this is needed for every Rails developer. As I totally agree the author’s claim, that SQL performance tuning is not just a DBA task but a developer’s task, as the performance is related to business logic and only developers understand that. And also we should think performance from design, and it’s not an afterthought.
PS: There are simpler solutions for Devise multitenancy authentication, such as RailsCasts and this blog, but customizing Devise gave me an excuse to explore the source code of Warden and Devise though :).
Last year I read the book Multitenancy with Rails written by Ryan Bigg. In the book when he implements the authentication for the multi-tenancy, he uses Warden instead of Devise, cause using Devise will need a lot of customization. And Recently I need to implement this multi-tenancy authentication for a Rails application, and I want to use Devise, so I checked the source code of Warden and Devise and found a way to customize Devise to do it.
In my application, I have two models, Merchant and User, one user can be the owner of one or more merchant, so they are a has_and_belongs_to_many relationship.
classMerchant<ActiveRecord::BaseEXCLUDED_SUBDOMAINS=%w(admin www administrator admins owner)validates_exclusion_of:subdomain,in:EXCLUDED_SUBDOMAINS,message:"is not allowed. Please choose another subdomain"validates_format_of:subdomain,with:/\A[\w\-]+\Z/i,allow_blank:true,message:"is not allowed. Please choose another subdomain."validates:subdomain,presence:true,uniqueness:truemount_uploader:avatar,AvatarUploaderbefore_validationdoself.subdomain=subdomain.to_s.downcaseendhas_and_belongs_to_many:owners,class_name:'User',join_table:'merchants_owners'defowner?(user)returnfalseunlessuser.present?!!owners.find_by(id:user.id)endendclassUser<ActiveRecord::Baseend
Each merchant can access its web interface through a subdomain URL. In model Merchant there is a unique attribute subdomain, this will be used for subdomain. For example, one merchant’s subdomain is skywatch, then the URL for this merchant is http://skywatch.xhop.pe . And for the authentication, a user can login this URL only if he is this merchant’s owner.
And in Merchant class we defined an instance method owner? of check if a user is owner of a merchant.
Subdomain Routes Configuration
For all controllers related to a merchant, I put the controllers under a module Merchant.
123456789
constraints(Constraints::SubdomainRequired)doroot'merchant/dashboard#index',as::merchant_rootnamespace:merchantdoresources'products'# and other resourcesendend
We set a constraint Constraints::SubdomainRequired to match merchant’s routes.
So only when the request has a subdomain and the subdomain is not www, then it will match merchants’ routes.
Warden and Devise
Warden is a Rack middleware which provides authentication for web applications. You can register Strategies in Warden to define how to authenticate a user.
Strategies
For example, the following is to add a :password strategy in Warden
1234567891011
Warden::Strategies.add(:password)dodefvalid?params['username']||params['password']enddefauthenticate!u=User.authenticate(params['username'],params['password'])u.nil??fail!("Could not log in"):success!(u)endend
When register a strategy, you should provide a name(:password as above), and an object or block, the object should implement two methods,
valid?: It’s optional to declare a valid? method, and if you don’t declare it, the strategy will always be run. If you do declare it though, the strategy will only be tried if #valid? evaluates to true. This could be used to check if all necessary parameters are valid in the request
authenticate!: This is where the work of actually authenticating the request steps in. Here’s where the logic for authenticating your requests occurs.
You have a number of request related methods available.
request # Rack::Request object
session # The session object for the request
params # The parameters of the request
env # The Rack env object
There are also a number of actions you can take in your strategy.
halt! # halts cascading of strategies. Makes this one the last one processed
pass # ignore this strategy. It is not required to call this and this is only sugar
success! # Supply success! with a user object to log in a user. Causes a halt!
fail! # Sets the strategy to fail. Causes a halt!
redirect! # redirect to another url. You can supply it with params to be encoded and also options. Causes a halt!
custom! # return a custom rack array to be handed back untouched. Causes a halt!
There’s a couple of misc things to do too:
headers # set headers to respond with relevant to the strategy
errors # provides access to an errors object. Here you can put in errors relating to authentication
After configuring Strategies in Warden, you can set the strategies to scopes. Warden can use different strategies on different scopes, and the scopes are independent and not interfere each other. For example, you can configure two scopes :user and :admin, some resources are protected in :user scope and other advanced resources are protected in :admin scope. If you authenticated :user scope, it still needs authentication for :admin scope for advanced resources. For more details check Warden Wiki
Devise
Devise depends on Warden, and it registers a Strategy database_authenticatable by default,
moduleDevisemoduleStrategies# Default strategy for signing in a user, based on their email and password in the database.classDatabaseAuthenticatable<Authenticatabledefauthenticate!resource=valid_password?&&mapping.to.find_for_database_authentication(authentication_hash)encrypted=falseifvalidate(resource){encrypted=true;resource.valid_password?(password)}resource.after_database_authenticationsuccess!(resource)endmapping.to.new.password=passwordif!encrypted&&Devise.paranoidfail(:not_found_in_database)unlessresourceendendendendWarden::Strategies.add(:database_authenticatable,Devise::Strategies::DatabaseAuthenticatable)
The Devise::Strategies::DatabaseAuthenticatable extends from Devise::Strategies::Authentiatable, which provides some methods for common authenticate behavior. If you are interested you could check Devise’s source code. In above code, we can see that firstly it finds the resource from authentication_hash, for our case, the resource will be a User instance, and then if validate resource’s password successfully, it calls success!, otherwise it calls fail.
Customize Devise Strategy
So for our case, we should not only check if the user’s username and password are valid, but also we must check if the user is an owner of the merchant.
Let’s create class called Devise::Strategies::DatabaseAuthenticatableForMerchantOwner, we put this class in lib folder,
moduleDevisemoduleStrategiesclassDatabaseAuthenticatableForMerchantOwner<Authenticatable# This code is mostly copied from Devise, but except the authentication of devise# the class includes this module should define a method 'custom_validate(resource)' to# provide other validates, for example if the resource is admin, or if th resource is # an owner of a merchant etc..defauthenticate!resource=valid_password?&&mapping.to.find_for_database_authentication(authentication_hash)encrypted=falseifvalidate(resource){encrypted=true;resource.valid_password?(password)}&&custom_validate(resource)resource.after_database_authenticationsuccess!(resource)elsemapping.to.new.password=passwordif!encrypted&&Devise.paranoidfail(:not_found_in_database)halt!endenddefcustom_validate(resource)merchant=get_merchantreturnfalseunlessmerchant.present?merchant.owner?(resource)enddefget_merchantMerchant.find_by(subdomain:request.subdomain)endendendend
The authenticate! method is almost copied from Devise::Strategies::DatabaseAuthenticatable, however, after validate(resource) it also calls method custom_validate, and in custom_validate it will get the merchant from the request’s subdomain and test if the resource(which is a user) is the merchant’s owner.
PS: It’s not a good practice to copy devise souce code here, I will update this blog if I find a better way.
Register our new strategy
Now we need to register this new strategy. After we installed the Devise gem, it will create a file config/initializers/devise.rb, so let’s update this file,
Devise will define a scope :user in Warden, and it will add the :database_authenticatable in the default_strategies list. Since we want to use :database_authenticatable_for_merchant_owner strategy, we delete :database_authenticatable and push :database_authenticatable_for_merchant_owner
After this, our application will use :database_authenticatable_for_merchant_owner and support Multitenancy authentication.
If you want to learn more about Rails and Devise, this page at udemy provides a good list of some Rails tutorials and can be used as a reference guide.
Long time no see! In last part we have shown that the template is rendered through ActionView::Renderer#render method, so in this part we will check this class in detail.
moduleActionView# This is the main entry point for rendering. It basically delegates# to other objects like TemplateRenderer and PartialRenderer which# actually renders the template.## The Renderer will parse the options from the +render+ or +render_body+# method and render a partial or a template based on the options. The# +TemplateRenderer+ and +PartialRenderer+ objects are wrappers which do all# the setup and logic necessary to render a view and a new object is created# each time +render+ is called.classRendererattr_accessor:lookup_contextdefinitialize(lookup_context)@lookup_context=lookup_contextend# Main render entry point shared by AV and AC.defrender(context,options)ifoptions.key?(:partial)render_partial(context,options)elserender_template(context,options)endend# Direct accessor to template rendering.defrender_template(context,options)#:nodoc:TemplateRenderer.new(@lookup_context).render(context,options)endendend
This class is initialized with a lookup_context, which is of class ActionView::LookupContext. And when the render method is called, for a normal template, the options has no :partial key, so render_template is called. We can see that the render_template method is actually creates an instance of TemplateRenderer and calls its render method.
So let’s have a look at this TemplateRenderer class,
moduleActionViewclassTemplateRenderer<AbstractRendererdefrender(context,options)@view=context@details=extract_details(options)template=determine_template(options)prepend_formats(template.formats)@lookup_context.rendered_format||=(template.formats.first||formats.first)render_template(template,options[:layout],options[:locals])endprivate# Determine the template to be rendered using the given options.defdetermine_template(options)keys=options.has_key?(:locals)?options[:locals].keys:[]ifoptions.key?(:body)Template::Text.new(options[:body])elsifoptions.key?(:text)Template::Text.new(options[:text],formats.first)elsifoptions.key?(:plain)Template::Text.new(options[:plain])elsifoptions.key?(:html)Template::HTML.new(options[:html],formats.first)elsifoptions.key?(:file)with_fallbacks{find_template(options[:file],nil,false,keys,@details)}elsifoptions.key?(:inline)handler=Template.handler_for_extension(options[:type]||"erb")Template.new(options[:inline],"inline template",handler,:locals=>keys)elsifoptions.key?(:template)ifoptions[:template].respond_to?(:render)options[:template]elsefind_template(options[:template],options[:prefixes],false,keys,@details)endelseraiseArgumentError,"You invoked render but did not give any of :partial, :template, :inline, :file, :plain, :text or :body option."endendendend
This class extends from ActionView::AbstractRenderer, and the template is determined by the determinate_template method, we can see that this method checks some keys in options hash, for example :body, :text, etc. And last one it checks the :template key. From Part 1 we already knew that if the :template key is not set explicitly, the options[:template] will be the action name. And options[:prefixes] is an array. For example, when the index action of ArticlesController is accessed, the :template and :prefixes will be,
:prefixes : array [“articles”, “application”]
:template : string “index”
So the template is found by calling find_template method, and this method is defined in super class ActionView::AbstractRenderer, and let’s have a look at this class.
We can see that the find_template method actually is delegated to lookup_context, we will check this method later, but remember that when find_template method is called, it is passed a details object, which is returned by the extract_details method.
Check the extract_details method above, we can see that this method returns a hash. It get the registered_details from the lookup_context and then check if the options contains the key, if yes, the result hush will be the options value for that key(tranformed to an array).
So what’s in this ActionView::LookupContext#registered_details? Let’s check that.
moduleActionView# LookupContext is the object responsible to hold all information required to lookup# templates, i.e. view paths and details. The LookupContext is also responsible to# generate a key, given to view paths, used in the resolver cache lookup. Since# this key is generated just once during the request, it speeds up all cache accesses.classLookupContext#:nodoc:mattr_accessor:registered_detailsself.registered_details=[]defself.register_detail(name,options={},&block)self.registered_details<<nameinitialize=registered_details.map{|n|"@details[:#{n}] = details[:#{n}] || default_#{n}"}Accessors.send:define_method,:"default_#{name}",&blockAccessors.module_eval<<-METHOD,__FILE__,__LINE__+1 def #{name} @details.fetch(:#{name}, []) end def #{name}=(value) value = value.present? ? Array(value) : default_#{name} _set_detail(:#{name}, value) if value != @details[:#{name}] end remove_possible_method :initialize_details def initialize_details(details) #{initialize.join("\n")} end METHODend# Holds accessors for the registered details.moduleAccessors#:nodoc:endregister_detail(:locale)dolocales=[I18n.locale]locales.concat(I18n.fallbacks[I18n.locale])ifI18n.respond_to?:fallbackslocales<<I18n.default_localelocales.uniq!localesendregister_detail(:formats){ActionView::Base.default_formats||[:html,:text,:js,:css,:xml,:json]}register_detail(:variants){[]}register_detail(:handlers){Template::Handlers.extensions}endend
We can see that it has a module attribute registered_details, which is an array, whose elements is the detail name.
For example, in a rails console we can call ActionView::LookupContext.registered_details to see the default detail keys.
We can see that by default it registered 4 details: :locale, :formats, :variants and :handlers, just as in above code, the register_detail is called 4 times and passed those details keys one by one.
And also the class maintains an instance variable called @details which is a hash. The key of this hash is the detail key, the value normally is an array which is the detail value initialized from initialize_details. (We will talk about initialize_details later)
Each time the register_detail is called, it will add several instance methods to the class. For example, when passed :locale to the method, it will define following methods,
default_locale : returns the default locale which is the result returned from the passed block.
locale: which returns the locale value stored in instance variable @details
locale=: which sets the locale value to @details.
And also each time the registered_detail is called, the initialize_details will be redefined. For example, when firstly calling register_detail(:locale), the initialize_details will be like following,
So the initialize_details is just to get the details values from details for each registered detail key, if the key is not found, it will set the default detail values.
ActionView::LookupContext#find_template
Now let’s check the ActionView::LookupContext#find_template method.
moduleActionViewclassLookupContextincludeViewPaths# Helpers related to template lookup using the lookup context information.moduleViewPathsattr_reader:view_paths,:html_fallback_for_js# Whenever setting view paths, makes a copy so that we can manipulate them in# instance objects as we wish.defview_paths=(paths)@view_paths=ActionView::PathSet.new(Array(paths))enddeffind(name,prefixes=[],partial=false,keys=[],options={})@view_paths.find(*args_for_lookup(name,prefixes,partial,keys,options))endalias:find_template:finddeffind_all(name,prefixes=[],partial=false,keys=[],options={})@view_paths.find_all(*args_for_lookup(name,prefixes,partial,keys,options))enddefexists?(name,prefixes=[],partial=false,keys=[],options={})@view_paths.exists?(*args_for_lookup(name,prefixes,partial,keys,options))endalias:template_exists?:exists?# Adds fallbacks to the view paths. Useful in cases when you are rendering# a :file.defwith_fallbacksadded_resolvers=0self.class.fallbacks.eachdo|resolver|nextifview_paths.include?(resolver)view_paths.push(resolver)added_resolvers+=1endyieldensureadded_resolvers.times{view_paths.pop}endprotecteddefargs_for_lookup(name,prefixes,partial,keys,details_options)#:nodoc:name,prefixes=normalize_name(name,prefixes)details,details_key=detail_args_for(details_options)[name,prefixes,partial||false,details,details_key,keys]end# Compute details hash and key according to user options (e.g. passed from #render).defdetail_args_for(options)return@details,details_keyifoptions.empty?# most common path.user_details=@details.merge(options)if@cachedetails_key=DetailsKey.get(user_details)elsedetails_key=nilend[user_details,details_key]end# Support legacy foo.erb names even though we now ignore .erb# as well as incorrectly putting part of the path in the template# name instead of the prefix.defnormalize_name(name,prefixes)#:nodoc:prefixes=prefixes.presenceparts=name.to_s.split('/')parts.shiftifparts.first.empty?name=parts.popreturnname,prefixes||[""]ifparts.empty?parts=parts.join('/')prefixes=prefixes?prefixes.map{|p|"#{p}/#{parts}"}:[parts]returnname,prefixesendendendend
The find_template is implemented in module ActionView::LookupContext::ViewPaths, and ActionView::LookupContext includes this module. We can see that find_template is just an alias of method find. The find method delegats to @view_paths, which is an instance of ActionView::PathSet. So we need to understand what ActionView::PathSet#find is doing. Actually the ActionView::PathSet#find will delegate the find to a set of PathResolver, which we will check in next part.
In these days there are many free or paid web templates, especially for bootstrap templates. Recently I integrated a Bootstrap template called Loop which is bought on WrapBootstrap. Here I will explain some practices and caveats about the integration.
Location
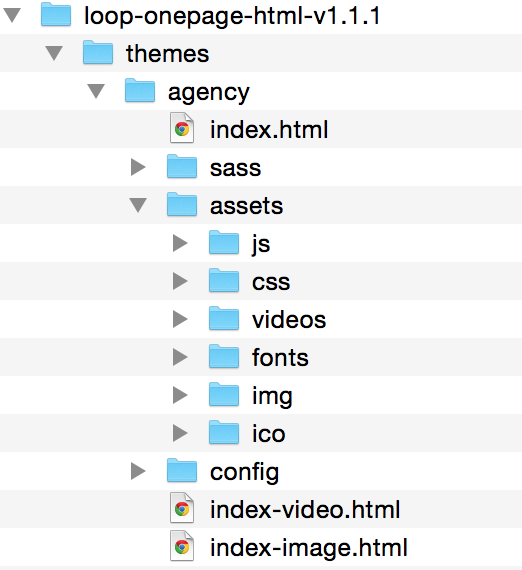
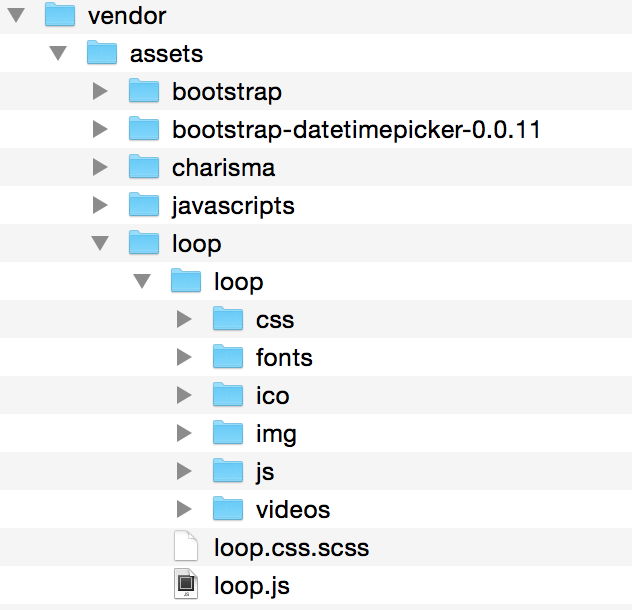
After extract the template zip file, we can see the organization is like the structure on the left. This template actually contains two templates, one for personal and one for Agency, and what I want is for the Agency. We can see that it puts all resource files like javascripts, CSS files and fonts file in folder assets. I want to keep this structure, so it would be easier to upgrade if it releases new version. The best practice for put 3rd-party template is to put it in vendor/assets, so I create a folder loop under vendor/assets and and copy the assets folder to vendor/assets/loop, like the following figure,
Notice that I changed the assets folder from the original template and named it loop, so when we reference the files under it from browser it will create paths like /assets/loop/js/loop.js because rails will append assets before the resource. This is to make the files in this template not collide with other assets.
Create index file
If you read my blog Using Index Files in Rails 4 Assets Pipeline before, you should know that the index files should be named loop.css.scss and loop.js, under foler vendor/assets/loop.
Basically the index files include all dependent css and javascripts, but pay atthention that their path should start with loop since we have put all assets in vendor/assets/loop/loop folder.
Update CSS files
In the template’s CSS files, there are reference to images such as background image, like following code,
Such url won’t work because Rails will precompile those assets in public/assets folder, so we name this file to main.css.scss, and use image-url tag, like following,
Sometimes the JS files also reference image files, like following code in loop.js,
loop.js
12345
slides:[// Slideshow Images{image:'assets/img/sliders/slider1.png',title:'<div class="hero-text"><h2 class="hero-heading">HANDCRAFTED</h2><p>Built to provide great visitor experience</p></div>',thumb:'',url:''},{image:'assets/img/sliders/slider2.png',title:'<div class="hero-text"><h2 class="hero-heading">PARALLAX</h2><p>Scrolling the page is fun with parallax background</p></div>',thumb:'',url:''},{image:'assets/img/sliders/slider3.png',title:'<div class="hero-text"><h2 class="hero-heading">BUY ONE FOR TWO</h2><p>Buy one to get both of the agency and personal theme</p></div>',thumb:'',url:''}]
For the same reason, after deploy production the JS files can’t find the image files also, in such case we should depend on the asset pipeline and change the file to loop.js.erb, and use image_path.
loop.js.erb
12345
slides:[// Slideshow Images{image:'<%= image_path 'loop/img/sliders/slider1.png'%>',title:'<div class="hero-text"><h2 class="hero-heading">HANDCRAFTED</h2><p>Built to provide great visitor experience</p></div>',thumb:'',url:''},{image:'<%= image_path 'loop/img/sliders/slider2.png'%>',title:'<div class="hero-text"><h2 class="hero-heading">PARALLAX</h2><p>Scrolling the page is fun with parallax background</p></div>',thumb:'',url:''},{image:'<%= image_path 'loop/img/sliders/slider3.png'%>',title:'<div class="hero-text"><h2 class="hero-heading">BUY ONE FOR TWO</h2><p>Buy one to get both of the agency and personal theme</p></div>',thumb:'',url:''}]
Also in our erb files, if we want to reference image files we should use image_path.
Precompile configuration
By default when we run rake assets:precompile, Rails won’t precompile the assets in vendor. So we need to add the loop template into configuration, in application.rb, we update like following,
In last part we introduced that when Rails looks for a template, it firstly populate an options hash by calling _normalize_render. And then in the render method, it will call render_to_body and pass the options, like the following code,
moduleAbstractControllermoduleRendering# Normalize arguments, options and then delegates render_to_body and# sticks the result in self.response_body.# :api: publicdefrender(*args,&block)options=_normalize_render(*args,&block)self.response_body=render_to_body(options)_process_format(rendered_format,options)ifrendered_formatself.response_bodyendendend
The render_to_body will select the templated based on the values in options hash. If we check the source code of AbstractController::Rendering#render_to_body, it’s nothing. Just as usual, it’s overridden by other modules.
moduleAbstractControllermoduleRendering# Performs the actual template rendering.# :api: publicdefrender_to_body(options={})endendend
Just as last part, we could run ApplicationController.ancestors_that_implement_instance_method to find what classes or modules implement that method, and we will find the following,
We can see three modules implement that method: ActionController::Renderers, ActionController::Rendering, and ActionView::Rendering. Let’s look at each of them one by one.
ActionController::Renderers#render_to_body
For ActionController::Renderers#render_to_body method, it registers a set of renderers, and then if the options contains the renderer key, then it will call that renderer. If no renderer is found, it just call super
Since :json is a registered renderer in ActionController::Renderers, it will call that renderer. You can also register your own renderer by calling ActionController::Renderers.add.
ActionController::Rendering#render_to_body
If in ActionController::Renderers#render_to_body, it doesn’t find a renderer, then it will call super, which is ActionController::Rendering#render_to_body. Let’s look at what this module does in the method.
moduleActionViewmoduleRenderingdefrender_to_body(options={})_process_options(options)_render_template(options)end# Returns an object that is able to render templates.# :api: privatedefview_renderer@_view_renderer||=ActionView::Renderer.new(lookup_context)endprivate# Find and render a template based on the options given.# :api: privatedef_render_template(options)#:nodoc:variant=options[:variant]lookup_context.rendered_format=nilifoptions[:formats]lookup_context.variants=variantifvariantview_renderer.render(view_context,options)endendend
It turns out that here is the the meat we are looking for. The render_to_body calls _render_template, and for the _render_template, it calls view_renderer.render(view_context, options).
The view_renderer is an instance of ActionView::Renderer, and when it’s initialized, it’s passing a lookup_context object, which is an instance of ActionView::LookupContext. The ActionView::LookupContext contains all information about looking for a template based on the options. So in next part we will check this class in detail, and check how LookupContext, ViewPaths, PathSet work together to find the template.
Have you ever wondered for a Rails application, when you access an action in a controller, how Rails finds the template to render? For example, when the action index in ArticlesController is accessed, by default the template app/views/articles/index.html.erb will be selected and rendered. Recently I’m digging the source code of Rails, and I invite you to walk through some source code in ActionPack and ActionView with me. And then I will show how the Rubygem versioncake works by modifying the Rails configuration.
In this first part we firstly check how the render works. Notice that we check Rails 4.2 source code. If you look at another version, the implementation may be slightly different.
The entry point for the render is from the AbstractController::Rendering#render method. The AbstractController is a module shared by ActionController and ActionMailer. Since these two modules share a lot of functionalities, Rails extract those same functionalities into AbstractController. Let’s have a look at this method.
moduleAbstractControllermoduleRendering# Normalize arguments, options and then delegates render_to_body and# sticks the result in self.response_body.# :api: publicdefrender(*args,&block)options=_normalize_render(*args,&block)self.response_body=render_to_body(options)_process_format(rendered_format,options)ifrendered_formatself.response_bodyendendend
In our controller, we could call render method directly. For example, we can call render ‘new’ to render the new.html.erb template. Or if we don’t call render explicitly, there is a module ActionController::ImplicitRender which will call a default render.
The send_action will be called when the action of a controller is triggered. It first calls super, then if in the action it doesn’t render anything, the performed? will return false. So default_render is called. We can see that when call default_render it just calls render without any arguments.
In AbstractController::Rendering#render method, it firstly calls _normalize_render then calls render_to_body. The _normalize_render returns an options object which is a Hash. In this part we will examine the _normalize_render method to see how the options is generated.
moduleAbstractControllermoduleRenderingprivate# Normalize args and options.# :api: privatedef_normalize_render(*args,&block)options=_normalize_args(*args,&block)#TODO: remove defined? when we restore AP <=> AV dependencyifdefined?(request)&&request&&request.variant.present?options[:variant]=request.variantend_normalize_options(options)optionsendendend
We see that it calls _normalize_args and _normalize_options methods. The _normalize_args and _normalize_options have different purposes.
_normalize_args
The _normalize_args is to convert all args into an options hash. For example when we call render method, we could call like this,
1
render'new',status::ok
Here the first argument ‘new’ is a String, and _normalize_args is responsible to put this first argument in options hash and give it an appropriate key.
moduleAbstractControllermoduleRendering# Normalize args by converting render "foo" to render :action => "foo" and# render "foo/bar" to render :file => "foo/bar".# :api: plugindef_normalize_args(action=nil,options={})ifaction.is_a?Hashactionelseoptionsendendendend
We see that this method by default almost does nothing, if the action is a Hash, it returns action, otherwise if action is for example, a string, it returns the second parameter which is the options hash.
Notice that ApplicationController includes some other modules which override this method, as we will see later.
_normalize_options
The _normalize_options method is for the modules to include other options. For a Rails application, the ApplicationController extends from ActionController::Base, and ActionController::Base includes a lot of modules, each module could override this method and add some other options.
Let’s firstly check how this method is implemented in AbstractController::Rendering.
By default this method does nothing. But it will be overridden in other modules.
Override _normalize_args
Rails source code is complex, one reason is because there are many modules could override other modules’s methods. For example, in a ArticlesController, let’s see its ancestors,
We can see that for a typical controller, it has a lot of ancestors and most of them are modules. All modules after AbstractController::Rendering could override its methods. I have created a gist to check which ancestors implement a method.
Run the above code in a rails console, then you can call ClassName.ancestors_that_implement_instance_method to check what ancestors implement a method.
Let’s first see what ancestors override the _normalize_args method,
Two modules override this instance method: ActionView::Rendering and ActionController::Rendering. Let’s look them in order from top to down.
Let’s look at ActionView::Rendering first,
actionview/lib/action_view/rendering.rb
123456789101112131415161718192021222324
moduleActionViewmoduleRendering# Normalize args by converting render "foo" to render :action => "foo" and# render "foo/bar" to render :template => "foo/bar".# :api: privatedef_normalize_args(action=nil,options={})options=super(action,options)caseactionwhenNilClasswhenHashoptions=actionwhenString,Symbolaction=action.to_skey=action.include?(?/)?:template::actionoptions[key]=actionelseoptions[:partial]=actionendoptionsendendend
We can see that for the first argument action, if it’s a string and the string include ‘/’, the key for this argument is :file, and if it doesn’t include ‘/’, the key is :action.
So if we call render ‘new’, the options will be { action: ‘new’ }, if we call render ‘articles/new’, the options will be { file: ‘articles/new’ }
Now let’s see how ActionController::Rendering overrides this method
moduleActionControllermoduleRendering# Normalize arguments by catching blocks and setting them on :update.def_normalize_args(action=nil,options={},&blk)#:nodoc:options=superoptions[:update]=blkifblock_given?optionsendendend
We can see that for this override, if the method is passed a block, it will set the block to options[:update]
Override _normalize_options
Just like _normalize_args, let’s examine what modules override _normalize_options. We can see following modules implement _normalize_options: [ActionController::Rendering, ActionView::Layouts, ActionView::Rendering, AbstractController::Rendering].
We can see that it addes three options by default,
If the options[:partial] is true, then it will set options[:partial] to action_name, the action_name is just the name of the action that is triggered. For example, if the index action of ArticlesController is triggered, action_name will be index.
If the options doesn’t include :partial, :file or :template, it set options[:prefixes]. Let’s see what’s set for this :prefixes in a minute.
It set the options[:template]. It’s either passed from the arguments or just use the action_name.
So what’s in options[:prefixes], let’s see how _prefixes method is implemented.
The AbstractController::Rendering module includes ActionView::ViewPaths module. And _prefixes method is implemented there.
ActionView::ViewPaths is an important module which we will examine in more details in later parts. It’s to manage the view paths for controllers. For example, by default Rails will append a view path #{Rails.root}app/views so the application knows to search templates in that specific view path.
For now let’s just focus on _prefixes method.
rails/actionview/lib/action_view/view_paths.rb
123456789101112
moduleActionViewmoduleViewPaths# The prefixes used in render "foo" shortcuts.def_prefixes# :nodoc:self.class._prefixesendendend
The _prefixes just calls the class method _prefixes.
rails/actionview/lib/action_view/view_paths.rb
123456789101112131415161718192021222324
moduleActionViewmoduleViewPathsmoduleClassMethodsdef_prefixes# :nodoc:@_prefixes||=beginreturnlocal_prefixesifsuperclass.abstract?local_prefixes+superclass._prefixesendendprivate# Override this method in your controller if you want to change paths prefixes for finding views.# Prefixes defined here will still be added to parents' <tt>._prefixes</tt>.deflocal_prefixes[controller_path]endendendend
Notice that Rails 4.2 implements that method and handles some deprecated parent prefixes. In above code I omitted that handling for clarity.
This ActionView::ViewPaths._prefixes calls recursively. it append local_prefixes with superclass’s _prefixes. The local_prefixes has just one element: controller_path.
The controller_path method is very simple, it’s implemented in AbstractController::Base. For example, for a controller ArticlesController, its controller_path will be articles, and for a controller Articles::CommentsController, its controller_path will be articles/comments
So the _prefixes method first gets it’s parent prefixes, and then prepends the current controller_path to the front.
For example, if our application has a ArticlesController, in our rails controller, we can call the following code to show the _prefixes.
We see that the prefixes contains two elements: articles and application. It’s because the ApplicationController extends from ActionController::Base, but ActionController::Base is abstract.
So now we can see that for ArticlesController#index action, when we just call render without any arguments, the options will contains following elements,
:prefixes : array [“articles”, “application”]
:template : string “index”
Now let’s see next one, how ActionView::Layouts overrides _normalize_options method,
We can see that if the options[:layout] is not set, the default layout is :default. And then options[:layout] is set to the result returned by _layout_for_option.
If you are interested you could check how _layout_for_options is implemented. When this module searches for the layout it will search “app/views/layouts/#{class_name.underscore}.rb” first, if it doesn’t found, then it will search super class. Since when a rails application is generated, an application.html.erb will be put in app/views/layouts and since by default all controllers’ parent is ApplicationController, so by default this layout will be used.
Finally let’s see how ActionController::Rendering overrides _normalize_options
moduleActionControllermoduleRendering# Normalize both text and status options.def_normalize_options(options)#:nodoc:_normalize_text(options)ifoptions[:html]options[:html]=ERB::Util.html_escape(options[:html])endifoptions.delete(:nothing)options[:body]=nilendifoptions[:status]options[:status]=Rack::Utils.status_code(options[:status])endsuperendendend
So this method just process :html, :nothing and :status options, which is straight forward.
So finally let’s see when we call render in ArticlesController#index without any arguments, the options will contains following values,
:prefixes : array [“articles”, “application”]
:template : string “index”
:layout : A Proc when called will return “app/views/layouts/application.html.erb”
Now we know how the options is normalized. And when Rails determines which template to render, it will extract details from the options. And we will look at how Rails determines template in later parts.
Here is the Part 3 of Deploying Rails Application on Ubuntu 14.04, and also the final part. In this part we will explain what the Capistrano template does.
Capistrano is a remote server automation and deployment tool written in Ruby. Capistrano 3 extends Rake DSL with its own set of DSL. I recommend you read the documents on Capistrano website.
Install Capistrano
In Gemfile we add the following gems,
12345678910
gem'capistrano','~> 3.1.0',group::development# rails specific capistrano funcitonsgem'capistrano-rails','~> 1.1.0',group::development# integrate bundler with capistranogem'capistrano-bundler',group::development# if you are using RBENVgem'capistrano-rbenv',"~> 2.0",group::development
The capistrano-rails, capistrano-bundler, and capistrano-rbenv are capistrano plugins. Let’s focus on capistrano first.
After running bundle install, if we run bundle exec cap install, it will generate following folders and files, actually when we copy the files from the capistrano template in part 2, it does the same thing.
In Capfile, It requires all necessary files, and also it includes all customized tasks in lib/capistrano/tasks.
Normally you have a production server and a staging server. So before you deploy new features to production server, you want to deploy to staging server first and after all QA are passed. So in config/deploy.rb, it defines the parameters that apply to all environments, and in config/deploy/production.rb and config/deploy/staging.rb it defines the parameters that apply to the specific environment. When we run bundle exec cap production deploy, it will load config/deploy.rb first, then config/deploy/production.rb, and then run the deploy rake task.
Understanding Capistrano
To understand Capistrano, the best way is to read its source code. Actually it’s not that hard as the source code of Capistrano is pretty easy to understand.
DSL
Capistrano defines a DSL. For those interested, can check the capistrano source code in folder lib/capistrano/dsl
Set attributes
You can set some attributes by using set, and then later use fetch to get the attribute value by key. In our sample application config/deploy.rb, you can see it sets a lot of attributes.
The following code snippets illustrate its use.
12345678
set:application,'deploy_sample'set:scm,:gitfetch:application# if :application key doesn't exist, it will return nilfetch:application,'application_name'# if the :application key doesn't exist, it will return default value 'application_name'set_if_empty:rbenv_type,:user# set only the :rbenv_type key is not defined
Server and Roles
Think about our deployment, at least we need a database server, an application server which is unicorn, and a web server which is Nginx or Apache. Sometimes db, app and web are on the same server, sometimes they are installed on different servers. Capistrano defines these as roles. For example, in our sample application, we define one server which has three roles,
If the web and app role point to two different servers, each server will create the directory. If we use :all, it will get all servers.
Rake tasks
Capistrano 3 actually is an extension of Rake tasks. So when we run bundle exec cap production deploy, it will run the deploy Rake task.
Let’s have a look at the definition of the deploy task. It’s in Capistrano source code /lib/capistrano/tasks/framework.rake
12345678910
desc'Deploy a new release.'task:deploydoset(:deploying,true)%w{ starting started updating updated publishing published finishing finished }.eachdo|task|invoke"deploy:#{task}"endend
So we can see that the deploy task runs the following 8 tasks in sequence,
* deploy:starting
* deploy:started
* deploy:updating
* deploy:updated
* deploy:publishing
* deploy:published
* deploy:finishing
* deploy:finished
If you are interested you should check the source code of those tasks. For example, in task deploy:updating it will invoke deploy:symlink:shared, which in turns invokes deploy:symlink:link_files, let’s see how this task is implemented
We can see that it will fetch the linked_files property, for our deploy sample application, we have set it to %w{config/database.yml config/secrets.yml}, so for each file, it will created a symbolic link in release_path, which points to the file in shared_path, where is release_path? Let’s have a look at Capistrano source code /lib/capistrano/dsl/paths.rb
So the release_path by default is the current_path, which is the sub folder current under deploy_path, which is set by deploy_to. Since in deploy_sample application, we already set deploy_to to “/product/#{fetch(:full_app_name)}”, so for our case, release_path will be /product/deploy_sample_production/current.
For ssh, Capistrano depends on sshkit, if you are interested, you could check the documents on its website.
In Capistrano we could customize the deploy process by injecting our own tasks. For example, in config/deploy.rb in our sample application, it defines
So after the task deploy:symlink:shared, it will run deploy:compile_assets_locally, which is to run rake assets:precompile locally and then upload the compiled assets to the server. You could use before or after to inject tasks before or after other tasks.
So now you should have an idea how Capistrano works. It’s just a series of Rake tasks which ssh to the server to execute commands to do the deployment. In my opinion the Capistrano source code is quite easy to understand, you could check more details if you like.
In Part 1 we have installed Nginx PostgreSQL, and also Monit. In this part I will show how to deploy the application through capistrano.
In this part we will execute many commands, some will be executed in the host machine (our Laptop or iMac for example), and some will be executed in the Vagrant VM. I will show different prompt when executing. On host machine the prompt will be like host:~/rails_projects/deploy_sample$, and on VM the prompt will be vagrant@vagrant-ubuntu-trusty-64:~$, or if we su as deploy, it will be deploy@vagrant-ubuntu-trusty-64:~$
Create deploy user
Just like we use an user postgres to manage our database, we should also use a standalone user to manage our application. We name this user deploy. And now let’s create this user.
12345678910111213141516
vagrant@vagrant-ubuntu-trusty-64:~$ sudo adduser --ingroup sudo deploy
Adding user `deploy' ...Adding new user `deploy'(1002) with group `sudo' ...Creating home directory `/home/deploy' ...
Copying files from `/etc/skel' ...
Enter new UNIX password:
Retype new UNIX password:
passwd: password updated successfully
Changing the user information for deploy
Enter the new value, or press ENTER for the default
Full Name []:
Room Number []:
Work Phone []:
Home Phone []:
Other []:
Is the information correct? [Y/n] Y
Set a password for deploy user and accept all default options.
Since we already add deploy user to sudo group. It can run sudo commands. However the user needs to input his password when sudo. When we run the capistrano deploy command later, it will run sudo commands. So I want to update this user so that he doesn’t need to type password when running sodo commands. For this we need to update the /etc/sudoers file. It’s recommended to use the application visudo to update it.
1
vagrant@vagrant-ubuntu-trusty-64:~$ sudo visodu
Add the following line to this file, and then type Ctrl + O to save it as /etc/sudoers, and type Ctrl + X to exit.
1
deploy ALL=(ALL:ALL) NOPASSWD:ALL
Notice that since we already add deploy user to sudo group, this line should be added under the line %sudo ALL=(ALL:ALL) ALL so it will take effect.
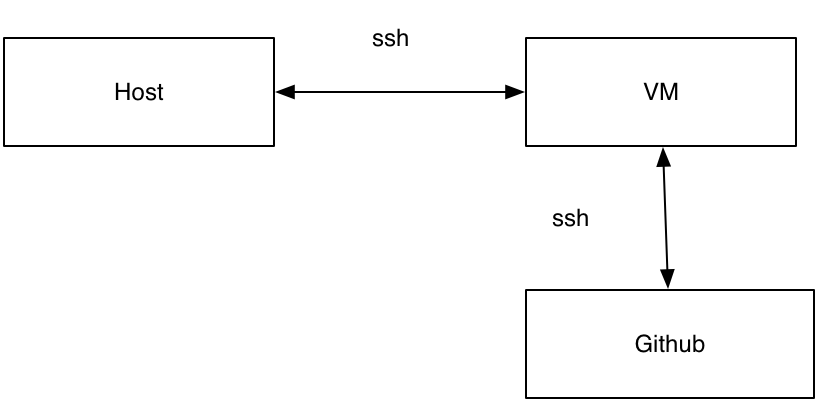
Our deployment organization is like following figure,
Our host communicates with VM by SSH, and also when the VM sync code from github, it also uses SSH. So we need two public/private keypairs here. One will be generated in VM and used to communicate with Github. And One will be generated in host machine and used to communicate with VM during deployment.
Let’s firstly generate a keypair for deploy user in VM. The public key for this keypair will be configured in github so the VM can download code from github.
Let’s firstly su as deploy
123
vagrant@vagrant-ubuntu-trusty-64:~$ su deploy
Password:
deploy@vagrant-ubuntu-trusty-64:/home/vagrant$
Now we go to the ~/.ssh folder and create a keypair.
1234
deploy@vagrant-ubuntu-trusty-64:/home/vagrant$ cd ~
deploy@vagrant-ubuntu-trusty-64:~$ mkdir .ssh
deploy@vagrant-ubuntu-trusty-64:~$ cd .ssh
deploy@vagrant-ubuntu-trusty-64:~$ ssh-keygen -t rsa -b 4096 -C climber2002@gmail.com
The climber2002@gmail.com is my email, and you should use your email here.
Accept default options, and after generation two files should be created, id_rsa and id_rsa.pub.
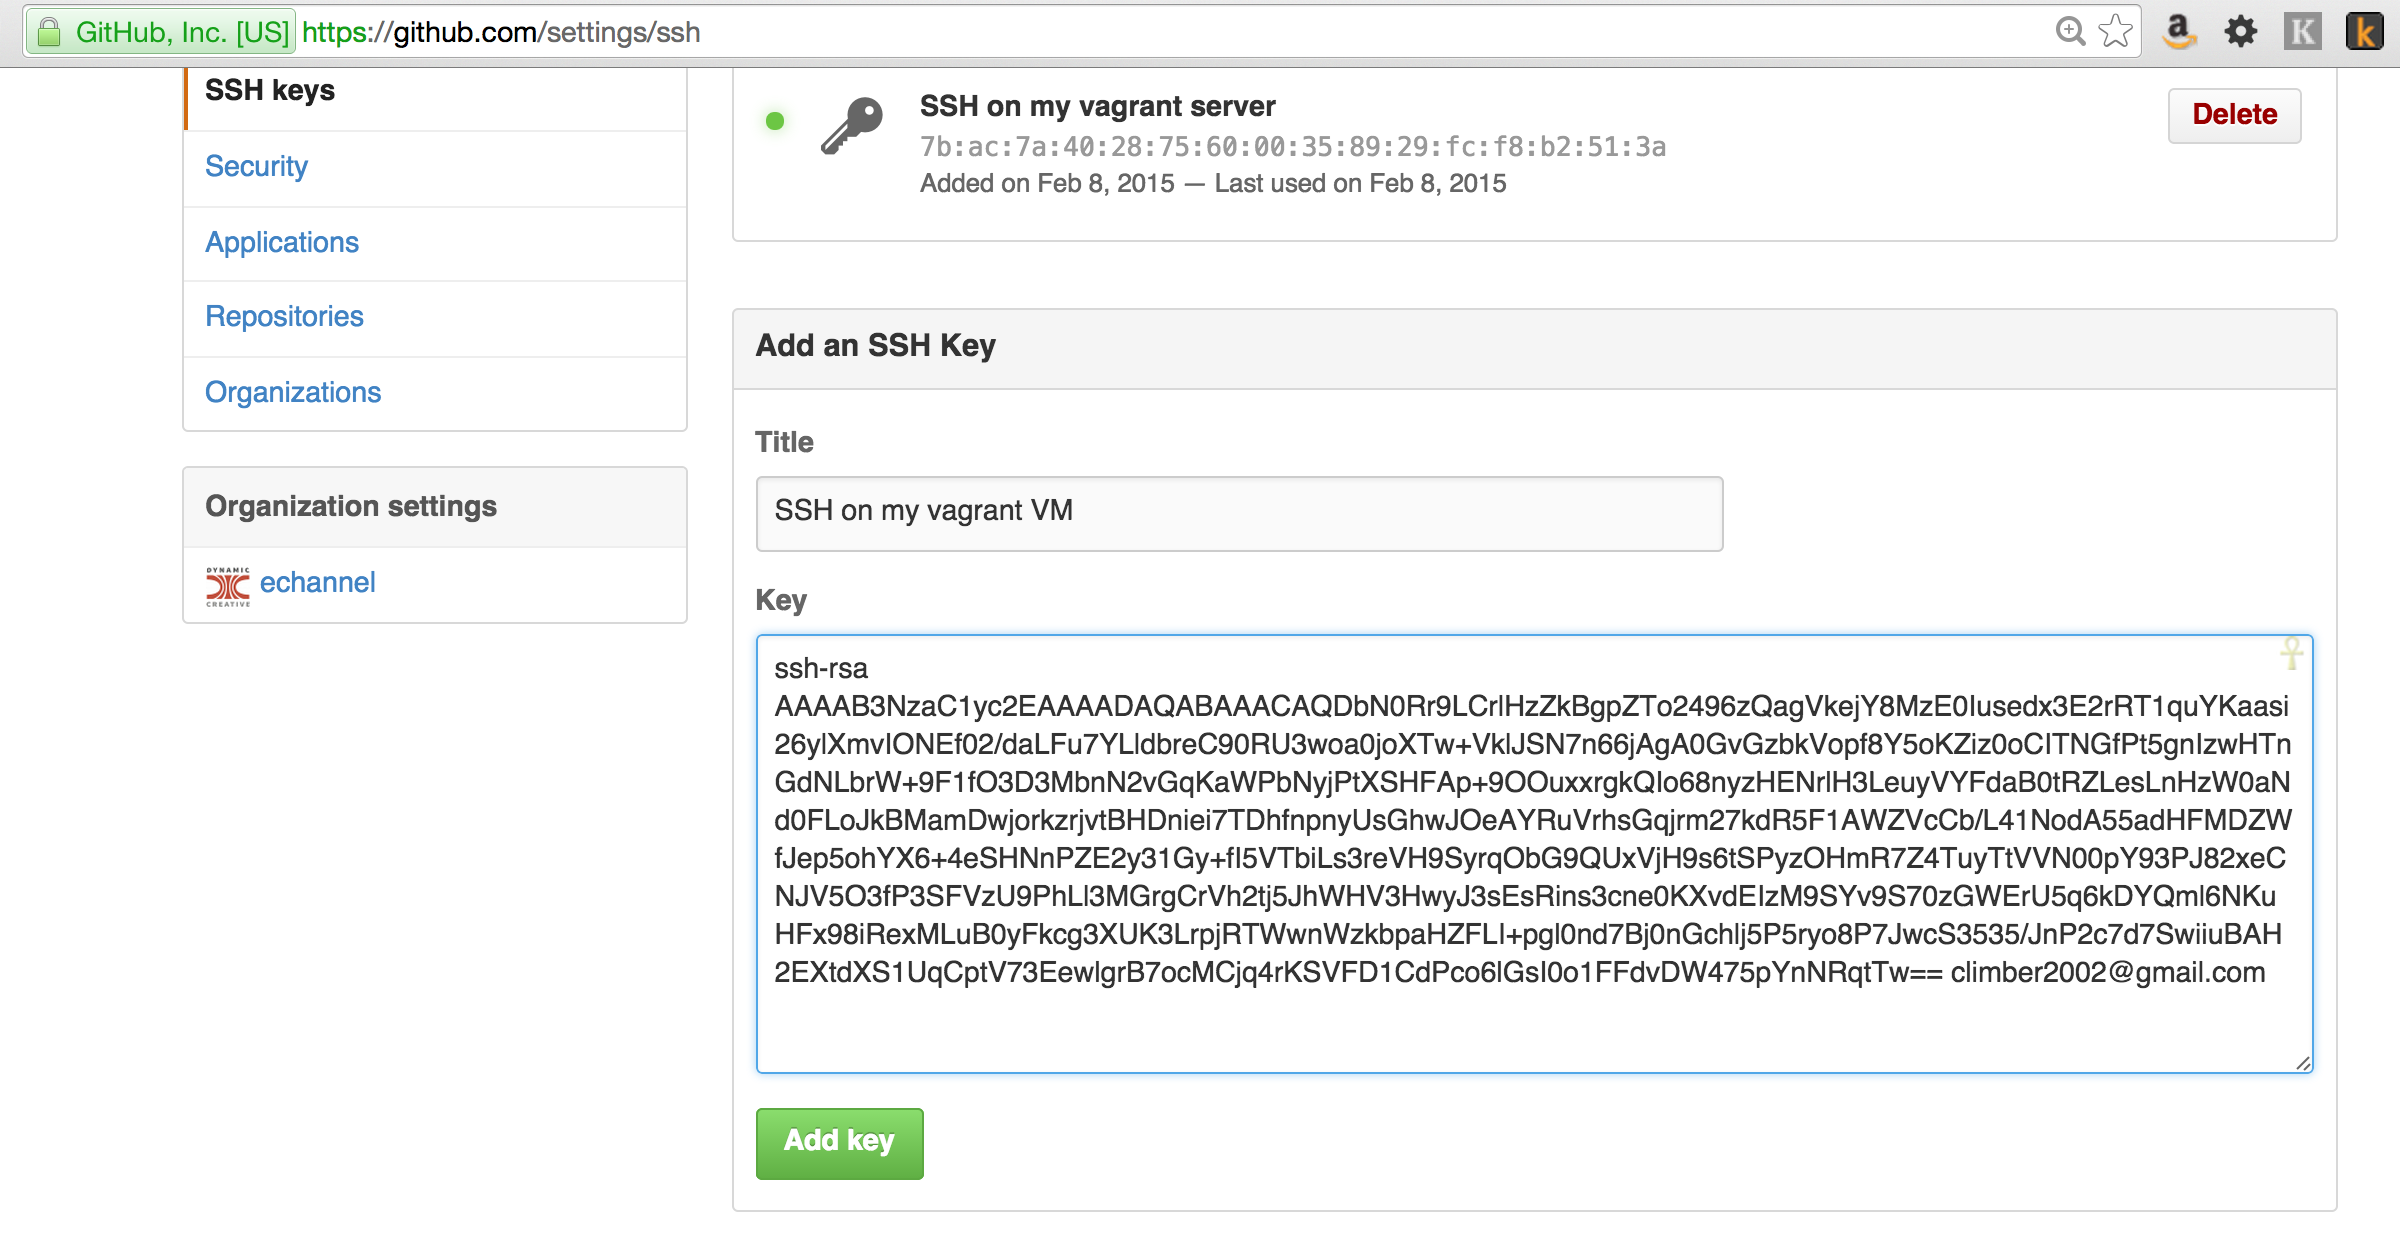
We can run cat id_rsa.pub and copy its content, and then configure this key in github.
In github, choose Settings –> SSH keys –> Add SSH key, and paste the public key, as the following snapshot.
Now we need to add the key of our host to the Vagrant VM. Let’s see if a key already existed.
123
host$ ls -l ~/.ssh
-rw-------  1 andywang  staff  1679 Jun 25  2014 id_rsa
-rw-r--r--  1 andywang  staff   403 Jun 25  2014 id_rsa.pub
Normally you should already have id_rsa and id_rsa.pub. If not run the ssh-keygen again in host to generate the SSH key.
And then lets copy the content of id_rsa.pub and copy it to VM’s ~/.ssh/authorized_keys. If this file doesn’t exist, create it. And then paste the content in id_rsa.pub in this file as a standalone line.
1
deploy@vagrant-ubuntu-trusty-64:~/.ssh$ vi authorized_keys
And also I updated the ssh config file /etc/ssh/sshd_config and changed the PasswordAuthentication yes to PasswordAuthentication no so we disable the password authentication, and only use Publickey authentication which is more secure.
After that let’s restart ssh service
1
deploy@vagrant-ubuntu-trusty-64:~/.ssh$ sudo service ssh restart
Now from your host server, you should be able to ssh into the Vagrant VM.
1234567891011121314151617181920212223242526
host$ ssh deploy@192.168.22.10
The authenticity of host '192.168.22.10 (192.168.22.10)' can't be established.RSA key fingerprint is b1:e4:e0:42:a1:37:0b:04:d3:88:8c:42:15:aa:00:b4.Are you sure you want to continue connecting (yes/no)? yesWarning: Permanently added '192.168.22.10'(RSA) to the list of known hosts.
Welcome to Ubuntu 14.04.1 LTS (GNU/Linux 3.13.0-45-generic x86_64) * Documentation: https://help.ubuntu.com/
System information as of Mon Feb 9 12:25:47 UTC 2015
System load: 0.0 Processes: 96
Usage of /: 3.1% of 39.34GB Users logged in: 2
Memory usage: 33% IP address for eth0: 10.0.2.15
Swap usage: 0% IP address for eth1: 192.168.22.10
Graph this data and manage this system at:
https://landscape.canonical.com/
Get cloud support with Ubuntu Advantage Cloud Guest:
http://www.ubuntu.com/business/services/cloud
Last login: Mon Feb 9 12:25:48 2015 from 192.168.22.1
deploy@vagrant-ubuntu-trusty-64:~$ sudo ls
Rbenv
Now we install the Rbenv. We will use Rbenv installer to ease our installation. Since we will use deploy user as our application owner. Make sure you firstly su as deploy.
After the installation is complete, add following lines to ~/.bashrc, pay attention that you need to add it at the top of the file. Since the script will return if it’s not running interactively.
Now we will try to deploy with Capistrano. We will use the capistrano 3 template to help us. Don’t worry if you don’t fully understand, I will explain it in next part.
Now firstly let’s clone the capistrano template in our host station. For me, both this project and the deploy_sample project are in the same folder which is ~/rails_projects
And then in Gemfile of our deploy_sample project, let’s add the necessary gems.
12345678910111213
# Use Unicorn as the app servergem'unicorn'gem'capistrano','~> 3.1.0',group::development# rails specific capistrano funcitonsgem'capistrano-rails','~> 1.1.0',group::development# integrate bundler with capistranogem'capistrano-bundler',group::development# if you are using RBENVgem'capistrano-rbenv',"~> 2.0",group::development
After that let’s run bundle install to install all the gems.
The capistrano 3 templates added some customized tasks, so lets copy all the files from the template to our project.
The Capistrano templates has some template files in config/shared folder, these files will be copied to a shared folder in VM when we run the task deploy:setup_config. Notice that we also want secrets.yml to be in the shared folder, so it won’t be committed in our git repository. So let’s copy this file into shared folder also. We change the filename to secrets.yml.erb as the task will render the erb file to secrets.yml during setup.
set:application,'deploy_sample'set:deploy_user,'deploy'# setup repo detailsset:scm,:gitset:repo_url,'git@github.com:climber2002/deploy_sample.git'# setup rbenv.set:rbenv_type,:userset:rbenv_ruby,'2.1.4'set:rbenv_prefix,"RBENV_ROOT=#{fetch(:rbenv_path)} RBENV_VERSION=#{fetch(:rbenv_ruby)}#{fetch(:rbenv_path)}/bin/rbenv exec"set:rbenv_map_bins,%w{rake gem bundle ruby rails}# how many old releases do we want to keep, not muchset:keep_releases,5# files we want symlinking to specific entries in sharedset:linked_files,%w{config/database.yml config/secrets.yml}# dirs we want symlinking to sharedset:linked_dirs,%w{bin log tmp/pids tmp/cache tmp/sockets vendor/bundle public/system}# what specs should be run before deployment is allowed to# continue, see lib/capistrano/tasks/run_tests.capset:tests,[]# which config files should be copied by deploy:setup_config# see documentation in lib/capistrano/tasks/setup_config.cap# for details of operationsset(:config_files,%w( nginx.conf database.example.yml log_rotation monit unicorn.rb unicorn_init.sh secrets.yml))# which config files should be made executable after copying# by deploy:setup_configset(:executable_config_files,%w( unicorn_init.sh))# files which need to be symlinked to other parts of the# filesystem. For example nginx virtualhosts, log rotation# init scripts etc. The full_app_name variable isn't# available at this point so we use a custom template # tag and then add it at run time.set(:symlinks,[{source:"nginx.conf",link:"/etc/nginx/sites-enabled/"},{source:"unicorn_init.sh",link:"/etc/init.d/unicorn_"},{source:"log_rotation",link:"/etc/logrotate.d/"},{source:"monit",link:"/etc/monit/conf.d/.conf"}])# this:# http://www.capistranorb.com/documentation/getting-started/flow/# is worth reading for a quick overview of what tasks are called# and when for `cap stage deploy`namespace:deploydo# make sure we're deploying what we think we're deployingbefore:deploy,"deploy:check_revision"# only allow a deploy with passing tests to deployedbefore:deploy,"deploy:run_tests"# compile assets locally then rsyncafter'deploy:symlink:shared','deploy:compile_assets_locally'after:finishing,'deploy:cleanup'# remove the default nginx configuration as it will tend# to conflict with our configs.before'deploy:setup_config','nginx:remove_default_vhost'# reload nginx to it will pick up any modified vhosts from# setup_configafter'deploy:setup_config','nginx:reload'# Restart monit so it will pick up any monit configurations# we've addedafter'deploy:setup_config','monit:restart'# As of Capistrano 3.1, the `deploy:restart` task is not called# automatically.after'deploy:publishing','deploy:restart'end
We changed the following things,
1. We changed the application to deploy_sample, which is our application name
2. We changed repo_url to git@github.com:climber2002/deploy_sample.git, which is our git repository
3. We changed the rbenv_type from :system to :user, and rbenv_ruby to 2.1.4, which is the version we installed just now
4. We changed the linked_files to add secrets.yml, the linked files will be stored in share folder but they will be created a symbolic link in config folder.
5. We changed the config_files to add secrets.yml, since we also want to copy this file to shared folder.
Now let’s update config/deploy/production.rb file as following,
12345678910111213141516171819202122232425262728
set:stage,:productionset:branch,"master"# This is used in the Nginx VirtualHost to specify which domains# the app should appear on. If you don't yet have DNS setup, you'll# need to create entries in your local Hosts file for testing.set:server_name,"www.example.com example.com"# used in case we're deploying multiple versions of the same# app side by side. Also provides quick sanity checks when looking# at filepathsset:full_app_name,"#{fetch(:application)}_#{fetch(:stage)}"server'192.168.22.10',user:'deploy',roles:%w{web app db},primary:trueset:deploy_to,"/product/#{fetch(:full_app_name)}"# dont try and infer something as important as environment from# stage name.set:rails_env,:production# number of unicorn workers, this will be reflected in# the unicorn.rb and the monit configsset:unicorn_worker_count,5# whether we're using ssl or not, used for building nginx# config fileset:enable_ssl,false
We changed following things for this file
1. We changed the server to 192.168.22.10, which is our VM IP address.
2. We changed deploy_to to /product/#{fetch(:full_app_name)} since we want to deploy to /product folder.
During real deployment you should also change the server_name to the correct domain name for your server.
Now let’s run the command to setup deploy.
1
host:~/rails_projects/deploy_sample$ bundle exec cap production deploy:setup_config
This step will copy all shared folders to /product/deploy_sample_production/shared/config folder, let’s check that folder in our VM,
12345678910
deploy@vagrant-ubuntu-trusty-64:~/.ssh$ cd /product/deploy_sample_production/shared/config
deploy@vagrant-ubuntu-trusty-64:/product/deploy_sample_production/shared/config$ ls -l
total 28
-rw-r----- 1 deploy sudo  203 Feb 10 04:45 database.example.yml
-rw-r----- 1 deploy sudo  188 Feb 10 04:45 log_rotation
-rw-r----- 1 deploy sudo 2629 Feb 10 04:45 monit
-rw-r----- 1 deploy sudo  645 Feb 10 04:45 nginx.conf
-rw-r----- 1 deploy sudo  935 Feb 10 04:45 secrets.yml
-rwxr-x--x 1 deploy sudo 2001 Feb 10 04:45 unicorn_init.sh
-rw-r----- 1 deploy sudo 1333 Feb 10 04:45 unicorn.rb
We can see that some files are copied to the /product/deploy_sample_production/shared/config folder. Now we need to update the database.yml and secrets.yml.
For database.yml, let’s firstly copy the database.example.yml to database.yml
12
deploy@vagrant-ubuntu-trusty-64:/product/deploy_sample_production/shared/config$ cp database.example.yml database.yml
deploy@vagrant-ubuntu-trusty-64:/product/deploy_sample_production/shared/config$ vi database.yml
We set the username and password to the value we created in Part 1, and also we set host to localhost since we installed database and application on same server.
Now we need to update secrets.yml, firstly lets generate a secret from our project folder
Now we copy this value to secrets.yml, of course you can also use an environment variable. After update our secrets.yml look like this,
12345678910
development:secret_key_base:75b397c3479019e0d5b2c7e3f57660c501369ffa4232958bcde366dc08e86b2f227fb1a57e172eccafc37fcfd5616909d4105d0d07069a4d061abf58a5745eeftest:secret_key_base:351180e5d983a83fa207f7df16e8509ad55910bab6d4e7a9e94dd3e80f8385fc8d8f5b1101fd2e565d2a0afb340917ac245d2ef69e00686e6eb6044ad92b3104# Do not keep production secrets in the repository,# instead read values from the environment.production:secret_key_base:9f529340b1a34f223cb7a6fd2cf0d0d039ed5d03fe3d2b2787cc712585ffcee22e14e6136486356b12f383bc48f231896d556da131bd8c8d8bcf17bbc9ef7048
the production:secret_key_base is set to the value we just created.
Now all preparation has been done, now let’s do the deploy!
Let’s run following command,
1
host:~/rails_projects/deploy_sample$ bundle exec cap production deploy
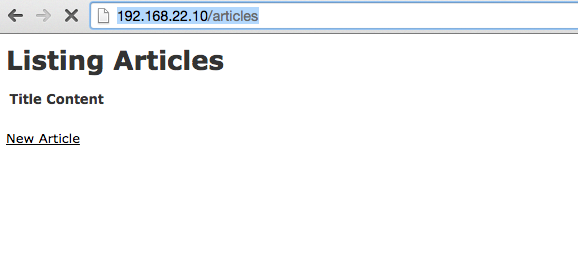
If everything runs correctly, after a long logs the deployment should be successful. And from your browser you can access http://192.168.22.10/articles to see the Article scaffold we’ve created.
Summary
In this part we’ve introduced the steps to deploy by using Capistrano 3. And we utilized a Capistrano template. But you may be wondering what Capistrano has done for us. So in next part I will introduct what has been done in this template.