In Part 1 we have installed Nginx PostgreSQL, and also Monit. In this part I will show how to deploy the application through capistrano.
In this part we will execute many commands, some will be executed in the host machine (our Laptop or iMac for example), and some will be executed in the Vagrant VM. I will show different prompt when executing. On host machine the prompt will be like host:~/rails_projects/deploy_sample$, and on VM the prompt will be vagrant@vagrant-ubuntu-trusty-64:~$, or if we su as deploy, it will be deploy@vagrant-ubuntu-trusty-64:~$
Create deploy user
Just like we use an user postgres to manage our database, we should also use a standalone user to manage our application. We name this user deploy. And now let’s create this user.
12345678910111213141516
vagrant@vagrant-ubuntu-trusty-64:~$ sudo adduser --ingroup sudo deploy
Adding user `deploy' ...Adding new user `deploy'(1002) with group `sudo' ...Creating home directory `/home/deploy' ...
Copying files from `/etc/skel' ...
Enter new UNIX password:
Retype new UNIX password:
passwd: password updated successfully
Changing the user information for deploy
Enter the new value, or press ENTER for the default
Full Name []:
Room Number []:
Work Phone []:
Home Phone []:
Other []:
Is the information correct? [Y/n] Y
Set a password for deploy user and accept all default options.
Since we already add deploy user to sudo group. It can run sudo commands. However the user needs to input his password when sudo. When we run the capistrano deploy command later, it will run sudo commands. So I want to update this user so that he doesn’t need to type password when running sodo commands. For this we need to update the /etc/sudoers file. It’s recommended to use the application visudo to update it.
1
vagrant@vagrant-ubuntu-trusty-64:~$ sudo visodu
Add the following line to this file, and then type Ctrl + O to save it as /etc/sudoers, and type Ctrl + X to exit.
1
deploy ALL=(ALL:ALL) NOPASSWD:ALL
Notice that since we already add deploy user to sudo group, this line should be added under the line %sudo ALL=(ALL:ALL) ALL so it will take effect.
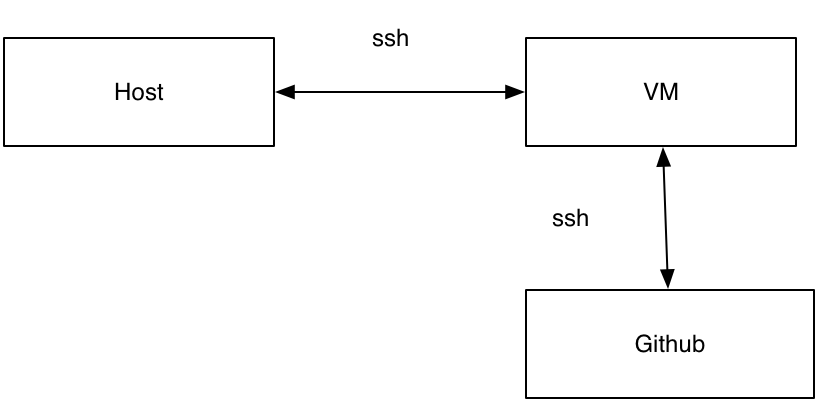
Our deployment organization is like following figure,
Our host communicates with VM by SSH, and also when the VM sync code from github, it also uses SSH. So we need two public/private keypairs here. One will be generated in VM and used to communicate with Github. And One will be generated in host machine and used to communicate with VM during deployment.
Let’s firstly generate a keypair for deploy user in VM. The public key for this keypair will be configured in github so the VM can download code from github.
Let’s firstly su as deploy
123
vagrant@vagrant-ubuntu-trusty-64:~$ su deploy
Password:
deploy@vagrant-ubuntu-trusty-64:/home/vagrant$
Now we go to the ~/.ssh folder and create a keypair.
1234
deploy@vagrant-ubuntu-trusty-64:/home/vagrant$ cd ~
deploy@vagrant-ubuntu-trusty-64:~$ mkdir .ssh
deploy@vagrant-ubuntu-trusty-64:~$ cd .ssh
deploy@vagrant-ubuntu-trusty-64:~$ ssh-keygen -t rsa -b 4096 -C climber2002@gmail.com
The climber2002@gmail.com is my email, and you should use your email here.
Accept default options, and after generation two files should be created, id_rsa and id_rsa.pub.
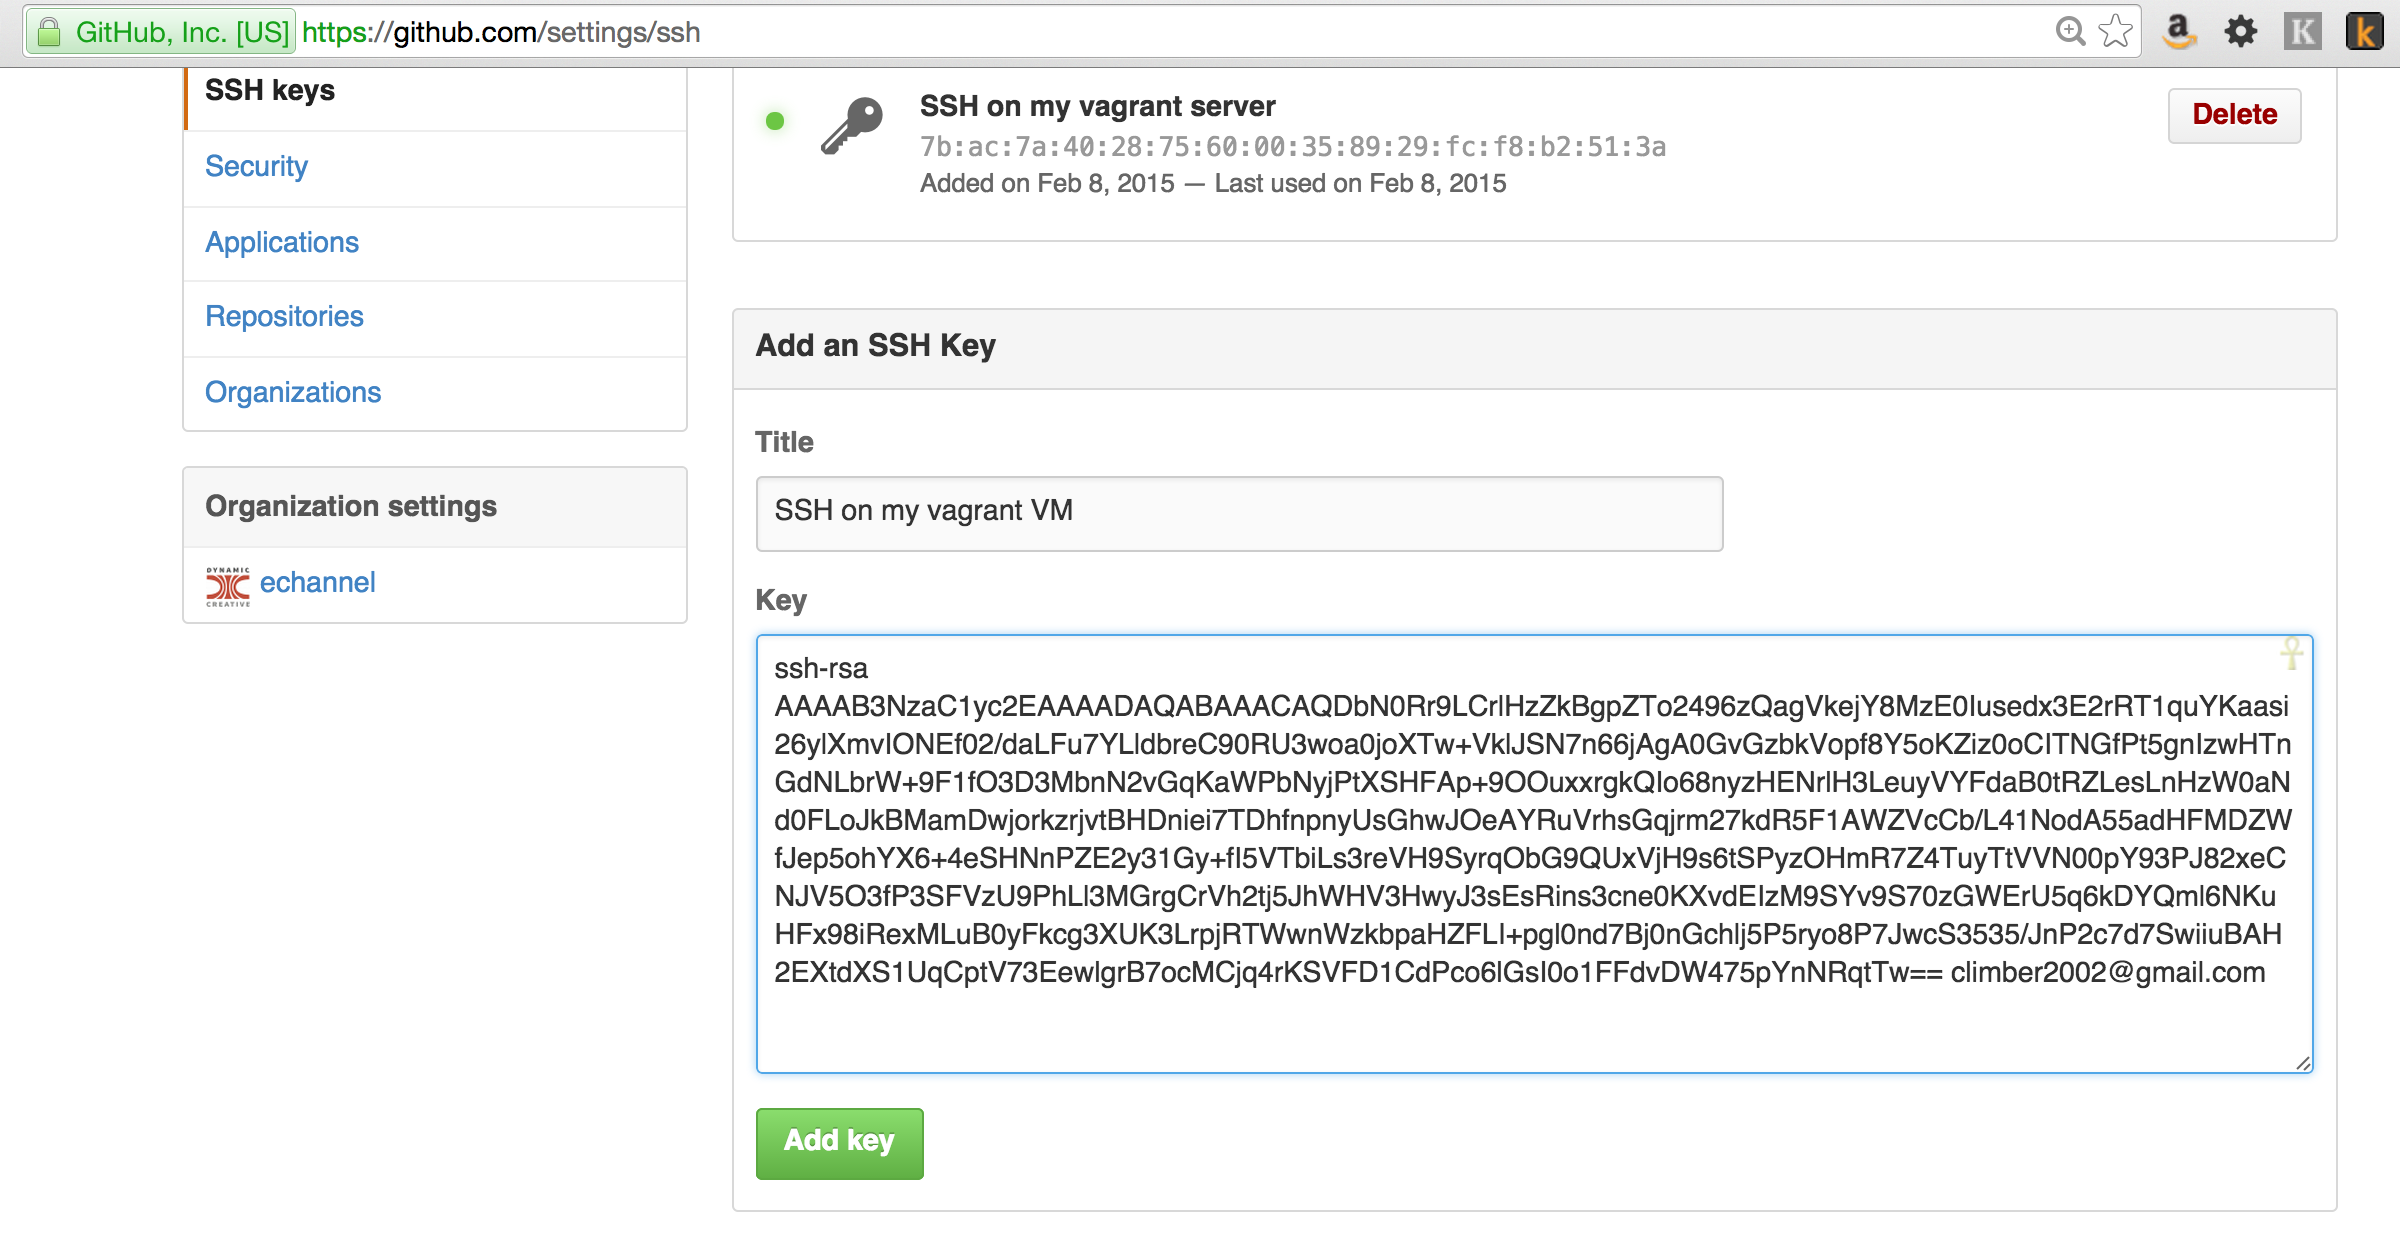
We can run cat id_rsa.pub and copy its content, and then configure this key in github.
In github, choose Settings –> SSH keys –> Add SSH key, and paste the public key, as the following snapshot.
Now we need to add the key of our host to the Vagrant VM. Let’s see if a key already existed.
123
host$ ls -l ~/.ssh
-rw-------  1 andywang  staff  1679 Jun 25  2014 id_rsa
-rw-r--r--  1 andywang  staff   403 Jun 25  2014 id_rsa.pub
Normally you should already have id_rsa and id_rsa.pub. If not run the ssh-keygen again in host to generate the SSH key.
And then lets copy the content of id_rsa.pub and copy it to VM’s ~/.ssh/authorized_keys. If this file doesn’t exist, create it. And then paste the content in id_rsa.pub in this file as a standalone line.
1
deploy@vagrant-ubuntu-trusty-64:~/.ssh$ vi authorized_keys
And also I updated the ssh config file /etc/ssh/sshd_config and changed the PasswordAuthentication yes to PasswordAuthentication no so we disable the password authentication, and only use Publickey authentication which is more secure.
After that let’s restart ssh service
1
deploy@vagrant-ubuntu-trusty-64:~/.ssh$ sudo service ssh restart
Now from your host server, you should be able to ssh into the Vagrant VM.
1234567891011121314151617181920212223242526
host$ ssh deploy@192.168.22.10
The authenticity of host '192.168.22.10 (192.168.22.10)' can't be established.RSA key fingerprint is b1:e4:e0:42:a1:37:0b:04:d3:88:8c:42:15:aa:00:b4.Are you sure you want to continue connecting (yes/no)? yesWarning: Permanently added '192.168.22.10'(RSA) to the list of known hosts.
Welcome to Ubuntu 14.04.1 LTS (GNU/Linux 3.13.0-45-generic x86_64) * Documentation: https://help.ubuntu.com/
System information as of Mon Feb 9 12:25:47 UTC 2015
System load: 0.0 Processes: 96
Usage of /: 3.1% of 39.34GB Users logged in: 2
Memory usage: 33% IP address for eth0: 10.0.2.15
Swap usage: 0% IP address for eth1: 192.168.22.10
Graph this data and manage this system at:
https://landscape.canonical.com/
Get cloud support with Ubuntu Advantage Cloud Guest:
http://www.ubuntu.com/business/services/cloud
Last login: Mon Feb 9 12:25:48 2015 from 192.168.22.1
deploy@vagrant-ubuntu-trusty-64:~$ sudo ls
Rbenv
Now we install the Rbenv. We will use Rbenv installer to ease our installation. Since we will use deploy user as our application owner. Make sure you firstly su as deploy.
After the installation is complete, add following lines to ~/.bashrc, pay attention that you need to add it at the top of the file. Since the script will return if it’s not running interactively.
Now we will try to deploy with Capistrano. We will use the capistrano 3 template to help us. Don’t worry if you don’t fully understand, I will explain it in next part.
Now firstly let’s clone the capistrano template in our host station. For me, both this project and the deploy_sample project are in the same folder which is ~/rails_projects
And then in Gemfile of our deploy_sample project, let’s add the necessary gems.
12345678910111213
# Use Unicorn as the app servergem'unicorn'gem'capistrano','~> 3.1.0',group::development# rails specific capistrano funcitonsgem'capistrano-rails','~> 1.1.0',group::development# integrate bundler with capistranogem'capistrano-bundler',group::development# if you are using RBENVgem'capistrano-rbenv',"~> 2.0",group::development
After that let’s run bundle install to install all the gems.
The capistrano 3 templates added some customized tasks, so lets copy all the files from the template to our project.
The Capistrano templates has some template files in config/shared folder, these files will be copied to a shared folder in VM when we run the task deploy:setup_config. Notice that we also want secrets.yml to be in the shared folder, so it won’t be committed in our git repository. So let’s copy this file into shared folder also. We change the filename to secrets.yml.erb as the task will render the erb file to secrets.yml during setup.
set:application,'deploy_sample'set:deploy_user,'deploy'# setup repo detailsset:scm,:gitset:repo_url,'git@github.com:climber2002/deploy_sample.git'# setup rbenv.set:rbenv_type,:userset:rbenv_ruby,'2.1.4'set:rbenv_prefix,"RBENV_ROOT=#{fetch(:rbenv_path)} RBENV_VERSION=#{fetch(:rbenv_ruby)}#{fetch(:rbenv_path)}/bin/rbenv exec"set:rbenv_map_bins,%w{rake gem bundle ruby rails}# how many old releases do we want to keep, not muchset:keep_releases,5# files we want symlinking to specific entries in sharedset:linked_files,%w{config/database.yml config/secrets.yml}# dirs we want symlinking to sharedset:linked_dirs,%w{bin log tmp/pids tmp/cache tmp/sockets vendor/bundle public/system}# what specs should be run before deployment is allowed to# continue, see lib/capistrano/tasks/run_tests.capset:tests,[]# which config files should be copied by deploy:setup_config# see documentation in lib/capistrano/tasks/setup_config.cap# for details of operationsset(:config_files,%w( nginx.conf database.example.yml log_rotation monit unicorn.rb unicorn_init.sh secrets.yml))# which config files should be made executable after copying# by deploy:setup_configset(:executable_config_files,%w( unicorn_init.sh))# files which need to be symlinked to other parts of the# filesystem. For example nginx virtualhosts, log rotation# init scripts etc. The full_app_name variable isn't# available at this point so we use a custom template # tag and then add it at run time.set(:symlinks,[{source:"nginx.conf",link:"/etc/nginx/sites-enabled/"},{source:"unicorn_init.sh",link:"/etc/init.d/unicorn_"},{source:"log_rotation",link:"/etc/logrotate.d/"},{source:"monit",link:"/etc/monit/conf.d/.conf"}])# this:# http://www.capistranorb.com/documentation/getting-started/flow/# is worth reading for a quick overview of what tasks are called# and when for `cap stage deploy`namespace:deploydo# make sure we're deploying what we think we're deployingbefore:deploy,"deploy:check_revision"# only allow a deploy with passing tests to deployedbefore:deploy,"deploy:run_tests"# compile assets locally then rsyncafter'deploy:symlink:shared','deploy:compile_assets_locally'after:finishing,'deploy:cleanup'# remove the default nginx configuration as it will tend# to conflict with our configs.before'deploy:setup_config','nginx:remove_default_vhost'# reload nginx to it will pick up any modified vhosts from# setup_configafter'deploy:setup_config','nginx:reload'# Restart monit so it will pick up any monit configurations# we've addedafter'deploy:setup_config','monit:restart'# As of Capistrano 3.1, the `deploy:restart` task is not called# automatically.after'deploy:publishing','deploy:restart'end
We changed the following things,
1. We changed the application to deploy_sample, which is our application name
2. We changed repo_url to git@github.com:climber2002/deploy_sample.git, which is our git repository
3. We changed the rbenv_type from :system to :user, and rbenv_ruby to 2.1.4, which is the version we installed just now
4. We changed the linked_files to add secrets.yml, the linked files will be stored in share folder but they will be created a symbolic link in config folder.
5. We changed the config_files to add secrets.yml, since we also want to copy this file to shared folder.
Now let’s update config/deploy/production.rb file as following,
12345678910111213141516171819202122232425262728
set:stage,:productionset:branch,"master"# This is used in the Nginx VirtualHost to specify which domains# the app should appear on. If you don't yet have DNS setup, you'll# need to create entries in your local Hosts file for testing.set:server_name,"www.example.com example.com"# used in case we're deploying multiple versions of the same# app side by side. Also provides quick sanity checks when looking# at filepathsset:full_app_name,"#{fetch(:application)}_#{fetch(:stage)}"server'192.168.22.10',user:'deploy',roles:%w{web app db},primary:trueset:deploy_to,"/product/#{fetch(:full_app_name)}"# dont try and infer something as important as environment from# stage name.set:rails_env,:production# number of unicorn workers, this will be reflected in# the unicorn.rb and the monit configsset:unicorn_worker_count,5# whether we're using ssl or not, used for building nginx# config fileset:enable_ssl,false
We changed following things for this file
1. We changed the server to 192.168.22.10, which is our VM IP address.
2. We changed deploy_to to /product/#{fetch(:full_app_name)} since we want to deploy to /product folder.
During real deployment you should also change the server_name to the correct domain name for your server.
Now let’s run the command to setup deploy.
1
host:~/rails_projects/deploy_sample$ bundle exec cap production deploy:setup_config
This step will copy all shared folders to /product/deploy_sample_production/shared/config folder, let’s check that folder in our VM,
12345678910
deploy@vagrant-ubuntu-trusty-64:~/.ssh$ cd /product/deploy_sample_production/shared/config
deploy@vagrant-ubuntu-trusty-64:/product/deploy_sample_production/shared/config$ ls -l
total 28
-rw-r----- 1 deploy sudo  203 Feb 10 04:45 database.example.yml
-rw-r----- 1 deploy sudo  188 Feb 10 04:45 log_rotation
-rw-r----- 1 deploy sudo 2629 Feb 10 04:45 monit
-rw-r----- 1 deploy sudo  645 Feb 10 04:45 nginx.conf
-rw-r----- 1 deploy sudo  935 Feb 10 04:45 secrets.yml
-rwxr-x--x 1 deploy sudo 2001 Feb 10 04:45 unicorn_init.sh
-rw-r----- 1 deploy sudo 1333 Feb 10 04:45 unicorn.rb
We can see that some files are copied to the /product/deploy_sample_production/shared/config folder. Now we need to update the database.yml and secrets.yml.
For database.yml, let’s firstly copy the database.example.yml to database.yml
12
deploy@vagrant-ubuntu-trusty-64:/product/deploy_sample_production/shared/config$ cp database.example.yml database.yml
deploy@vagrant-ubuntu-trusty-64:/product/deploy_sample_production/shared/config$ vi database.yml
We set the username and password to the value we created in Part 1, and also we set host to localhost since we installed database and application on same server.
Now we need to update secrets.yml, firstly lets generate a secret from our project folder
Now we copy this value to secrets.yml, of course you can also use an environment variable. After update our secrets.yml look like this,
12345678910
development:secret_key_base:75b397c3479019e0d5b2c7e3f57660c501369ffa4232958bcde366dc08e86b2f227fb1a57e172eccafc37fcfd5616909d4105d0d07069a4d061abf58a5745eeftest:secret_key_base:351180e5d983a83fa207f7df16e8509ad55910bab6d4e7a9e94dd3e80f8385fc8d8f5b1101fd2e565d2a0afb340917ac245d2ef69e00686e6eb6044ad92b3104# Do not keep production secrets in the repository,# instead read values from the environment.production:secret_key_base:9f529340b1a34f223cb7a6fd2cf0d0d039ed5d03fe3d2b2787cc712585ffcee22e14e6136486356b12f383bc48f231896d556da131bd8c8d8bcf17bbc9ef7048
the production:secret_key_base is set to the value we just created.
Now all preparation has been done, now let’s do the deploy!
Let’s run following command,
1
host:~/rails_projects/deploy_sample$ bundle exec cap production deploy
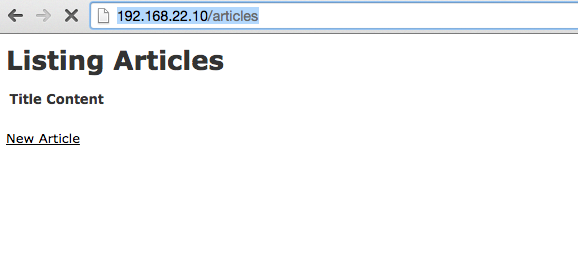
If everything runs correctly, after a long logs the deployment should be successful. And from your browser you can access http://192.168.22.10/articles to see the Article scaffold we’ve created.
Summary
In this part we’ve introduced the steps to deploy by using Capistrano 3. And we utilized a Capistrano template. But you may be wondering what Capistrano has done for us. So in next part I will introduct what has been done in this template.